
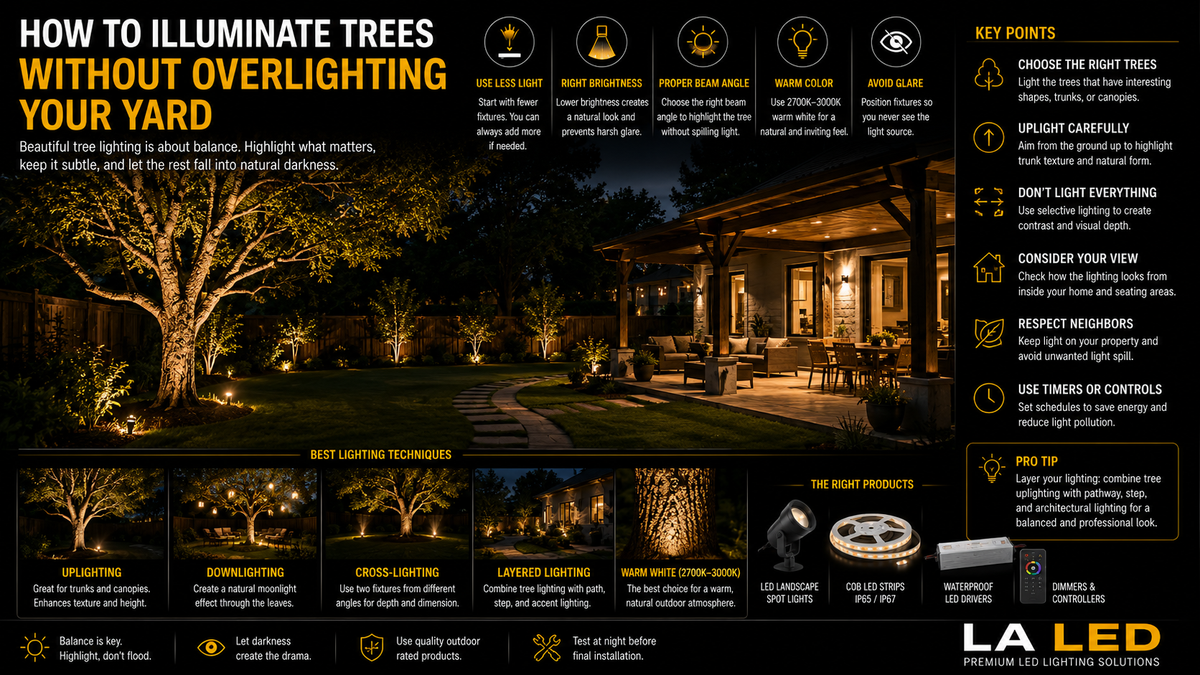
A beautifully illuminated tree can completely change the appearance of a backyard after sunset.
It can add depth to the landscape, highlight interesting branches, create dramatic shadows, and make an outdoor space feel more inviting.
But tree lighting is also easy to overdo.
Install too many fixtures or use lights that are too bright, and instead of creating an elegant landscape, you may end up with:
- Harsh glare
- Extremely bright trees surrounded by darkness
- Light shining into windows
- Distracting hotspots
- An outdoor space that feels more like a parking lot than a relaxing backyard
So, how do you illuminate trees without overlighting your yard?
The key is to light selectively.
Good landscape lighting isn't about making everything bright.
It's about deciding what deserves attention and what should remain darker.
Why Light Trees in the First Place?
Trees are some of the most visually interesting elements in a landscape.
During the day, their shape, texture, branches, and leaves naturally create depth.
At night, most of that disappears unless you intentionally illuminate it.
Well-designed tree lighting can:
- Add depth to the yard
- Highlight landscaping
- Create dramatic shadows
- Make large trees architectural features
- Improve nighttime atmosphere
- Create visual interest from inside the house
- Help define outdoor entertaining areas
A single beautifully illuminated tree can sometimes have more visual impact than ten smaller lights scattered around the yard.
1. Start with Fewer Lights
One of the easiest ways to avoid overlighting is simply to start small.
Don't install fixtures everywhere and then try to reduce the brightness afterward.
Instead, identify the most important landscape features first.
For example:
Large feature tree → Light
Small decorative tree → Maybe
Every shrub → Probably not
Every fence section → Probably not
Allowing some areas to remain darker creates contrast.
And contrast is what makes the illuminated areas stand out.
2. Choose Which Trees Deserve Lighting
Not every tree needs to be illuminated.
Look for trees with interesting characteristics such as:
- Large trunks
- Beautiful branching
- Interesting bark
- Wide canopies
- Sculptural shapes
- Seasonal foliage
- Strategic locations
A mature tree near a patio, pool, entrance, or visible window may be an excellent candidate.
Lighting every tree equally can reduce the impact of the landscape.
Instead, create a few visual focal points.
3. Use Uplighting Carefully
Uplighting is one of the most common techniques for illuminating trees.
A fixture is positioned near the ground and aimed upward toward the trunk or canopy.
This can highlight:
- Bark texture
- Branch structure
- Leaves
- Tree height
But the fixture doesn't necessarily need to point straight up.
Experimenting with the angle can create a more natural appearance.
For example, positioning a fixture slightly away from the trunk and aiming it upward can illuminate both the trunk and part of the canopy.
4. Don't Make the Entire Tree Equally Bright
Nature doesn't look evenly illuminated at night.
Professional-looking landscape lighting often includes variation.
Some areas should be brighter.
Others should fade into shadow.
Instead of trying to illuminate every branch and every leaf, allow parts of the tree to disappear naturally into darkness.
This creates:
Depth + Texture + Drama
Uniform brightness can make the tree look flat.
5. Use Lower Brightness Than You Think You Need
Outdoor lighting often looks much brighter after your eyes adjust to the darkness.
A fixture that seems modest during installation may feel surprisingly bright at night.
That's why starting with lower output is usually a good idea.
You can always increase the illumination later.
If you're using dimmable or adjustable outdoor lighting, begin at a lower level and evaluate the result after the surrounding environment is completely dark.
The goal is:
Highlight the tree—not illuminate the entire neighborhood.
6. Choose the Right Beam Angle
Beam angle has a major effect on tree lighting.
Narrow Beam
A narrower beam creates a more concentrated area of light.
It can be useful for:
- Tall narrow trees
- Trunks
- Specific branches
- Architectural landscape features
Wider Beam
A wider beam spreads illumination across a larger area.
It can work well for:
- Broad canopies
- Wide ornamental trees
- Large textured surfaces
The size and shape of the tree should influence your beam selection.
A narrow tree and a large spreading tree shouldn't necessarily use the same lighting approach.
7. Avoid Direct Glare
A landscape fixture can produce beautiful illumination on a tree while still being uncomfortable if people can see directly into the light source.
When positioning fixtures, consider viewpoints from:
- Patios
- Outdoor seating
- Windows
- Walkways
- Neighboring properties
- Driveways
Whenever possible, position or shield the fixture so people experience the effect of the light rather than staring into the source.
This is one of the biggest differences between professional-looking landscape lighting and poorly planned outdoor lighting.
8. Consider the View from Inside Your Home
Your backyard isn't only viewed while you're outside.
At night, landscape lighting can become part of your interior view.
Stand inside important rooms and look through the windows.
For example:
- Living room
- Kitchen
- Dining room
- Bedroom
Ask yourself:
Which tree would look beautiful illuminated from here?
Sometimes the best outdoor lighting design begins from inside the house.
A carefully illuminated tree outside a large window can almost function like nighttime artwork.
9. Warm White Usually Works Beautifully on Trees
For residential landscape lighting, warmer color temperatures often create a natural and comfortable appearance.
Common choices include:
2700K – Warm and inviting
3000K – Warm but slightly cleaner
These temperatures can work beautifully with:
- Tree bark
- Wood
- Stone
- Landscaping
- Outdoor architecture
Very cool white light can sometimes make residential landscaping appear harsh.
For many homes, 2700K–3000K is an excellent starting range.
10. Match the Lighting to the Tree
Different trees respond differently to light.
A tree with a dramatic trunk may benefit from lighting that emphasizes bark texture.
A tree with a wide canopy may benefit from broader illumination.
A tall narrow tree may look better with a more controlled vertical beam.
A tree with delicate leaves may create beautiful shadow patterns when illuminated from the right angle.
Instead of asking:
“What's the best tree light?”
Ask:
“What feature of this tree do I want people to notice?”
That leads to better lighting decisions.
11. Try Cross-Lighting for Large Trees
One fixture isn't always enough for a large feature tree.
Using two carefully positioned lights from different directions can reveal more of the tree's three-dimensional shape.
This technique is sometimes called cross-lighting.
For example:
Fixture 1 → Highlights trunk and left side
Fixture 2 → Adds softer illumination from another direction
The key is not to make both sides equally bright.
Different intensities can create a more natural sense of depth.
12. Consider Downlighting from Trees
Not all tree lighting needs to come from the ground.
In some professionally designed landscapes, fixtures can be mounted higher in a tree and directed downward.
This can create a beautiful moonlighting effect.
Light passes through branches and leaves, creating soft patterns on:
- Grass
- Pathways
- Patios
- Garden beds
The result can feel much more natural than simply flooding the yard with light.
However, tree-mounted electrical fixtures require careful installation and should account for tree growth, weather exposure, wiring, maintenance, and applicable electrical requirements.
Professional installation is often appropriate.
13. Don't Combine Too Many Techniques
Uplighting.
Downlighting.
Path lighting.
Fence lighting.
Pool lighting.
Patio lighting.
Architectural lighting.
All of these can look beautiful individually.
But using every technique at maximum brightness can make the yard visually chaotic.
Choose a hierarchy.
For example:
Primary Feature: Large illuminated tree
Secondary Lighting: Soft patio lighting
Functional Lighting: Low-level pathway lights
Background: Mostly dark
This gives the eye somewhere to focus.
14. Use Darkness as Part of the Design
This sounds strange when discussing lighting, but darkness is one of the most important tools in landscape lighting.
Without darkness, there is no contrast.
If every part of your backyard has the same brightness, nothing feels special.
A professional lighting design may intentionally leave:
- Portions of the lawn dark
- Some trees unlit
- Background areas subtle
- Certain garden sections in shadow
Then the illuminated tree becomes much more dramatic.
Think of darkness as negative space in your lighting design.
15. Avoid Lighting Directly Into Windows
Fixture placement should consider the house itself.
An uplight that beautifully illuminates a tree may also shine directly into a bedroom window.
Before finalizing the installation, check the lighting from:
- Inside the house
- Neighboring viewpoints
- Outdoor seating areas
Small changes in fixture angle can sometimes eliminate glare without reducing the visual effect on the tree.
16. Don't Forget Your Neighbors
Outdoor lighting shouldn't create unnecessary light spill onto neighboring properties.
Try to keep illumination focused on the intended landscape feature.
Good fixture aiming, shielding, lower brightness, and careful placement can help reduce unwanted spill.
Your tree should be illuminated.
Your neighbor's bedroom shouldn't be.
17. Avoid Extremely Bright Security-Lighting Effects
Tree lighting and security lighting have different purposes.
A bright floodlight may provide functional illumination, but it usually isn't the best tool for creating subtle landscape effects.
For decorative tree lighting, prioritize:
- Controlled beams
- Lower output
- Good placement
- Appropriate color temperature
- Minimal glare
This creates a more refined appearance.
18. Layer Tree Lighting with Other Outdoor Lighting
Tree lighting works best when it feels connected to the rest of the outdoor space.
For example, combining:
- Tree uplighting
- Warm COB LED lighting under outdoor cabinets
- Subtle step lighting
- Low-level path lighting
can create a complete nighttime environment.
For the step and bench layer, a low-output outdoor strip such as the 12V Outdoor SMD LED Strip (1.7W per foot) provides just enough light to define an edge without competing with the illuminated tree.
The important word is:
Subtle.
Each layer doesn't need to compete for attention.
19. COB LED Strips Can Complement Tree Lighting
COB LED strip lights aren't typically used to wrap tree trunks or branches.
But they can complement tree lighting beautifully when integrated into nearby architectural features.
For example:
- Pergolas
- Outdoor kitchens
- Covered patios
- Steps
- Benches
- Railings
- Architectural recesses
The continuous, dot-free appearance of COB lighting can provide soft ambient illumination while focused landscape fixtures highlight the trees.
The Outdoor Dotless Dimmable COB LED Strip (10mm, 24V) is IP65 rated and available in 2700K and 3000K, matching the warm range recommended above. For long pergola or perimeter runs, the 100ft Outdoor COB LED Strip (110V, IP65) runs directly from line voltage, which avoids long low-voltage cable runs across a yard.
Low-voltage outdoor runs also need a driver rated for the conditions, such as the 96W Dimmable LED Transformer (24V, IP65), or the 192W Dual Channel Dimmable LED Transformer (24V, IP65) when two separate zones need independent control.
This creates layered outdoor lighting instead of relying on one lighting type for everything.
20. Use Timers or Smart Controls
Your tree lighting doesn't necessarily need to remain on all night.
Timers and compatible smart controls can automatically operate landscape lighting during the hours when you actually enjoy it.
For example:
Sunset → Lights On
Late Evening → Lights Off
This can reduce unnecessary energy consumption and nighttime light pollution.
21. Consider Wildlife and the Night Environment
Outdoor lighting affects more than just the appearance of your property.
Excessive nighttime illumination can affect the surrounding environment and wildlife.
To reduce unnecessary light:
- Illuminate only where needed
- Keep brightness reasonable
- Use timers
- Avoid unnecessary upward spill
- Turn decorative lighting off when it's no longer needed
- Use warmer light where appropriate
Good landscape lighting should enhance your outdoor space without trying to eliminate darkness completely.
22. Test the Lighting Before Final Installation
One of the best things you can do is test fixture positions after dark.
Don't permanently install every fixture based only on daytime assumptions.
Temporarily position the lights and evaluate:
- Brightness
- Beam angle
- Shadows
- Glare
- Light spill
- View from inside
- Relationship with other landscape lighting
Move the fixture a few feet.
Change the angle.
Reduce the brightness.
Small adjustments can make a dramatic difference.
Example: Lighting One Large Backyard Tree
Imagine a large mature tree near a patio.
Instead of surrounding it with five bright fixtures, you might begin with:
One controlled uplight aimed toward the trunk and canopy.
Then evaluate the result.
If the opposite side disappears too much, add:
One softer secondary light from another angle.
Nearby patio lighting remains lower in brightness.
The lawn stays mostly dark.
Now the tree becomes the focal point without overwhelming the entire yard.
That's the goal.
Common Tree-Lighting Mistakes
Avoid these common problems:
Using too many fixtures
More lights don't automatically produce a better design.
Using excessive brightness
Outdoor environments naturally require less light than many people expect.
Ignoring glare
A beautiful tree isn't worth creating uncomfortable glare for people sitting nearby.
Using very cool light everywhere
Cool lighting can sometimes feel harsh in residential landscapes.
Lighting every tree
Selective illumination usually creates more visual impact.
Ignoring the house
Always check how outdoor lighting looks through your windows.
Leaving decorative lights on unnecessarily
Timers can help reduce energy use and unnecessary nighttime illumination.
Quick Tree Lighting Checklist
Before installing your lights, ask:
- Which trees are actually worth highlighting?
- What feature of the tree do I want to emphasize?
- Should I use uplighting, downlighting, or both?
- What beam angle fits the tree?
- Is the fixture brighter than necessary?
- Can people see directly into the light source?
- Does the light shine into any windows?
- Is there unwanted spill onto neighboring properties?
- Does the color temperature complement the landscape?
- How does the tree look from inside the house?
- Do I need a timer or control system?
- Am I leaving enough darkness in the landscape?
If you can answer these questions before installation, you're much more likely to achieve a professional result.
Final Thoughts
Beautiful tree lighting isn't about making your yard as bright as possible.
In fact, the best landscape lighting often does the opposite.
It uses small amounts of carefully controlled light to reveal selected features while allowing the rest of the landscape to remain naturally darker.
Choose the most interesting trees.
Use appropriate beam angles.
Keep brightness under control.
Reduce glare.
Consider warm 2700K–3000K illumination.
And always evaluate how the lighting interacts with patios, windows, pathways, neighboring properties, and other outdoor lighting.
Most importantly:
Don't be afraid of darkness.
When light and shadow are balanced correctly, one beautifully illuminated tree can transform the entire backyard.
FAQ
What color temperature is best for lighting trees?
For many residential landscapes, 2700K–3000K warm white lighting provides an attractive and natural appearance that complements trees, stone, wood, and landscaping.
Should you uplight or downlight trees?
Both can work. Uplighting emphasizes trunks and canopies, while carefully designed downlighting can create a natural moonlighting effect. The best choice depends on the tree and desired result.
How many lights do you need for one tree?
There is no fixed number. A smaller tree may need only one fixture, while a large feature tree may benefit from two or more carefully positioned lights. Start with fewer fixtures and add only when necessary.
How do you prevent glare from tree uplights?
Position and aim fixtures so people don't look directly into the light source. Shielding and careful placement can also help control glare.
Should every tree in the yard be illuminated?
No. Selective lighting usually creates a more attractive landscape because illuminated trees stand out against darker surroundings.
Is 3000K good for outdoor tree lighting?
Yes. 3000K provides a warm but relatively clean appearance and is a popular option for residential architectural and landscape lighting.
Can COB LED strips be used with landscape lighting?
Yes. COB LED strips can complement tree lighting when installed in architectural areas such as pergolas, outdoor kitchens, steps, benches, or covered patios.