A COB tape light job usually looks easy right up until the strip won’t stick, the dimmer flickers, or the run goes dim at the far end. That is why knowing how to install cob tape lights the right way matters. A clean result depends less on luck and more on matching the strip, driver, controls, mounting surface, and wire run before you ever peel the backing.
COB tape lights are popular because they deliver a continuous, dotless line of light that looks finished in kitchens, shelving, cove details, vanities, offices, and display work. They are also more forgiving visually than older strip styles because you do not see individual diode points. But the installation still has to be precise. Premium lighting only performs like a premium system when the electrical and mounting details are handled correctly.
What to check before you install COB tape lights
Start with the basics - voltage, wattage, location rating, and control method. Most COB tape lights are either 12V or 24V, and the driver has to match that exactly. If the strip is 24V, use a 24V LED driver. If it is 12V, use a 12V driver. Mixing voltages is a fast way to damage product or create unreliable performance.
Next, calculate total wattage for the full run. If your tape light uses 4 watts per foot and the run is 16 feet, that is 64 watts. You do not want to size the driver at the exact load. Give it headroom, typically around 20 percent, so the driver is not working at its limit all the time. That helps with performance and long-term reliability.
Then look at dimming. This is where many installations go sideways. If the project needs wall dimming, make sure the driver and dimmer protocol are compatible - TRIAC, ELV, MLV, or 0-10V, depending on the system. If the strip is tunable white, RGB, RGBW, or pixel-controlled, you may also need a controller between the driver and the tape light. The strip itself is only one part of the system.
Location matters too. Dry, damp, and wet installations do not use the same components. Under-cabinet in a conditioned kitchen is different from a bathroom vanity, and both are different from an outdoor bar or landscape feature. Use drivers, junction boxes, connectors, and tape lights rated for the environment.
Tools and materials for a clean install
A professional result usually requires more than the strip and a power supply. Have your tape light, compatible driver or transformer, any needed controller, low-voltage wire, connectors or soldering materials, mounting channel if specified, wire strippers, a measuring tape, alcohol wipes, and a test power source ready before the install starts.
If the project is visible and design-driven, aluminum channels are worth serious consideration. They improve heat management, keep the run straight, protect the strip, and give the installation a more architectural finish. In high-end residential and commercial work, that detail often makes the difference between a lighting upgrade and something that looks added on later.
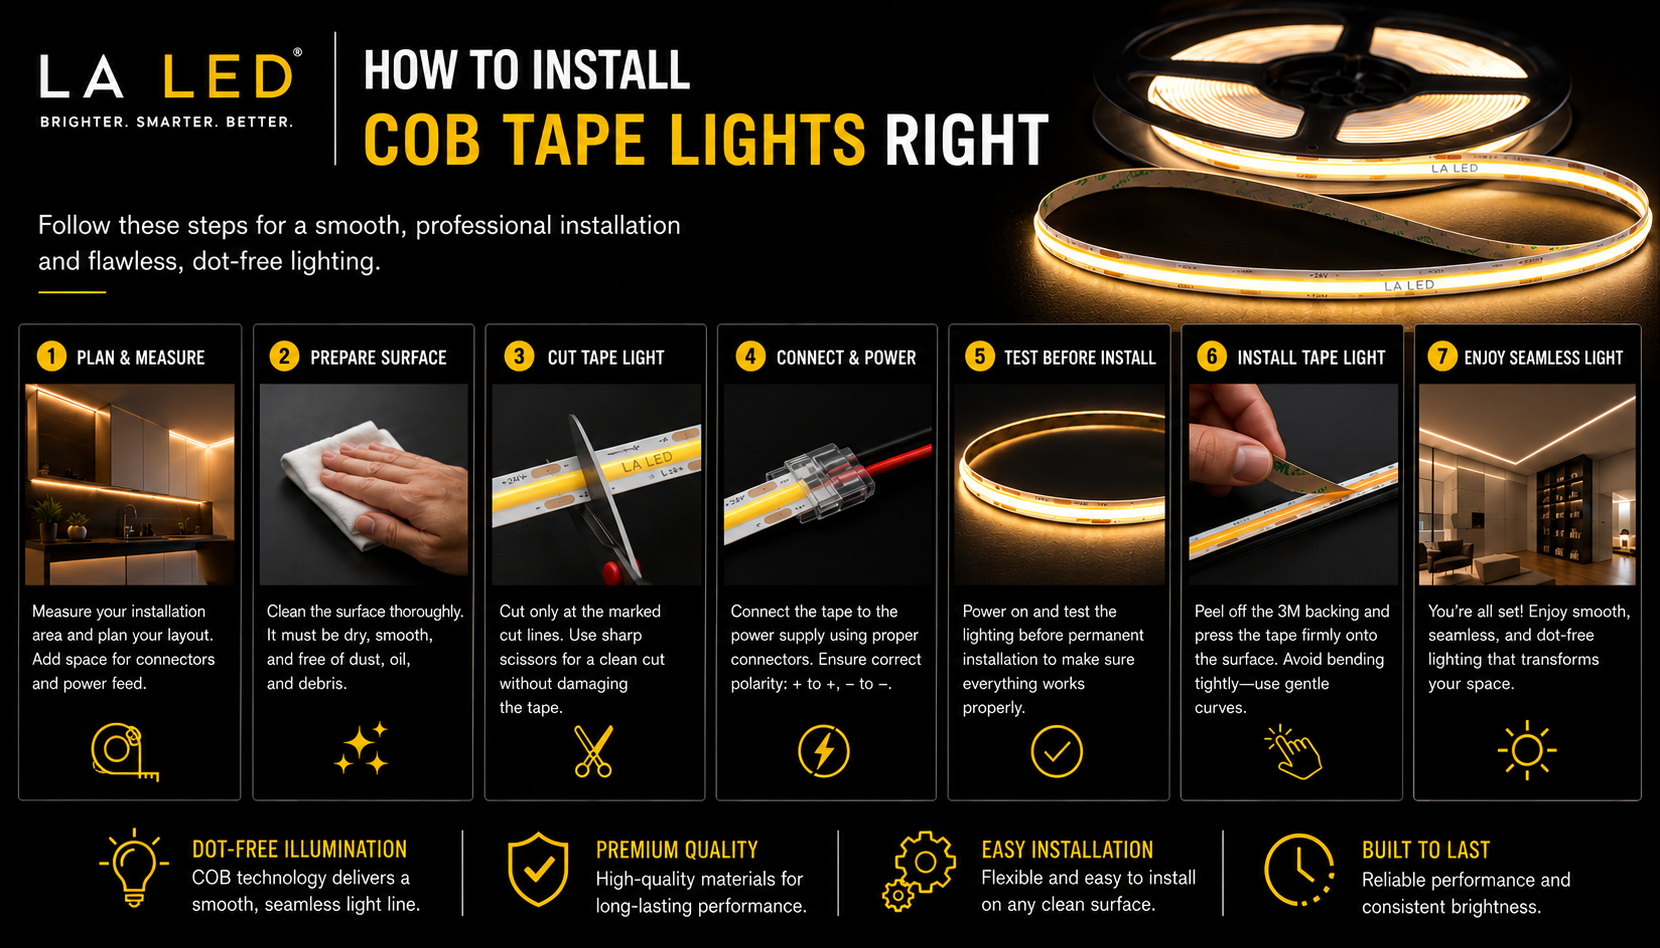
How to install COB tape lights step by step
1. Measure the run carefully
Measure the actual mounting path, not the room dimension. Cabinet lips, returns, inside corners, and obstructions can change the true length. If the run includes multiple sections, sketch them out and note where power will enter.
This is also the time to think about voltage drop. On longer runs, the far end of the strip may dim or shift if power is fed from only one side. Depending on strip voltage, wattage, and distance, you may need to feed power from both ends or use shorter sections. There is no one-size-fits-all rule here - longer and higher-load runs need more planning.
2. Test the system before mounting
Before adhesive touches the surface, connect the strip, driver, and any controller and verify operation. Confirm brightness, color function if applicable, dimming response, and polarity. If something is wrong, it is much easier to fix on the bench than after the tape is mounted in a finished space.
3. Prepare the mounting surface
The surface has to be clean, dry, and stable. Dust, grease, fresh paint, and rough texture are common reasons strips peel away. Wipe the area with alcohol and let it dry fully.
If you are installing under cabinets, on millwork, or inside channels, make sure the substrate is smooth and free of debris. Adhesive backing helps position the strip, but it should not be treated like the only structural support in a demanding installation. Heat, humidity, and gravity all work against adhesive over time.
4. Cut only at marked cut points
COB tape lights can be cut, but only at designated intervals. Cutting in the wrong spot can take out a section or ruin the whole run. Use sharp scissors and keep the cut clean.
If the installation requires custom lengths with turns or jumps, plan those at the cut marks in advance. On some jobs, soldered leads are the most reliable option. Clip connectors can save time, but they are not always the best choice for tight spaces, vibration, or long-term serviceability. For trade installations where callbacks matter, secure electrical connections are worth the extra effort.
5. Mount the strip evenly
Peel the backing gradually instead of all at once. Press the strip into place a little at a time so it stays straight and does not twist. COB tape lights give a smooth line of light, but if the strip snakes or lifts, the finished look suffers.
Do not bend the strip harder than the manufacturer allows. Tight corners can damage internal circuitry. If the path changes direction sharply, use a connector, a wire jump, or corner accessory if the system supports it.
6. Make the low-voltage connections
Observe polarity carefully. Positive goes to positive and negative goes to negative. Reversed polarity may prevent operation and can complicate troubleshooting if multiple sections are involved.
Keep wire runs appropriately sized for the load and distance. Small-gauge wire on a long run can contribute to voltage drop. That is especially relevant in larger kitchens, commercial shelving, and outdoor applications where the driver may be remote from the light. If you are trying to hide wiring, do not let aesthetics override electrical performance.
7. Connect the driver and controls
Install the driver in an accessible, code-appropriate location with proper ventilation. Drivers should not be buried where they cannot be serviced later. If a junction box is required, use one appropriate to the environment and electrical setup.
When dimming or color control is part of the design, follow the exact wiring diagram for the driver and controller. A high-quality COB strip can still flicker or fail to respond properly if paired with the wrong dimmer or wired incorrectly. That is one reason professionals often source the strip, driver, and controls as a matched system rather than piecing together unknown components.
Common mistakes when installing COB tape lights
The most common problem is undersizing or mismatching the power supply. The second is poor surface prep. The third is treating all dimming systems as interchangeable when they are not.
Another frequent issue is overextending a single run. Even if the strip lights up, brightness can taper off or color can shift across the length. A shorter run with better power distribution usually outperforms one long run pushed beyond practical limits.
Heat is another factor. COB tape lights run efficiently, but they still need sensible thermal management. In enclosed millwork, channels or heat-dissipating surfaces can improve longevity. This becomes more important in premium installations expected to perform consistently for years.
When channels, waterproofing, and specialty drivers matter
If the strip is visible, use a channel. If the area is damp or wet, use products rated for it from end to end, not just the tape light alone. If the space uses advanced dimming, tunable white, RGB, RGBW, or 110V COB options, build the system around compatibility first, not price first.
That is where a specialist supplier has an advantage. LA LED Lighting focuses on USA-standard-compliant components, dimming compatibility, and architectural-grade performance, which matters when you need the strip, driver, and accessories to work together without guesswork.
Final testing and adjustment
Once everything is mounted and wired, power the system and let it run long enough to reveal issues. Check for even illumination, stable dimming, secure adhesion, and any warm connection points. If a section looks weak, do not assume the strip is defective. It may be a voltage drop issue, a loose connection, or an overloaded driver.
A well-installed COB tape light system should look effortless when finished. That polished result comes from careful measuring, correct power sizing, compatible controls, and disciplined installation habits. Take the extra time up front, and the light will do what it is supposed to do - disappear into the design and perform reliably every day.