How to Install Recessed Downlights Right
Recessed downlights are one of the most popular lighting solutions for modern homes and commercial spaces. When installed correctly, they provide clean lines, even illumination, and a premium finished appearance. However, achieving professional results requires more than simply cutting holes in the ceiling.
Proper planning, fixture placement, wiring, and dimming compatibility all play an important role in creating a lighting system that performs reliably for years to come.
Choose the Right Recessed Downlight First
Before starting installation, identify the type of fixture being used.
Common options include:
-
Canless wafer downlights
-
Retrofit recessed LED modules
-
New construction recessed housings
-
Adjustable gimbal downlights
Each type has different installation requirements, wiring methods, and ceiling cutout specifications.
When selecting fixtures, verify:
-
IC or Non-IC rating
-
Dry, damp, or wet location rating
-
Dimming compatibility
-
Color temperature
-
Beam angle
For bathrooms, covered patios, and exterior soffits, always choose fixtures rated for damp or wet locations where required.
Plan the Layout Before Cutting
One of the biggest mistakes homeowners make is cutting ceiling holes before creating a lighting plan.
Proper spacing helps eliminate:
-
Dark spots
-
Uneven lighting
-
Harsh shadows
-
Wall streaking
As a general guideline, fixture spacing is often approximately half the ceiling height.
Examples:
-
8-foot ceiling = roughly 4 feet between fixtures
-
10-foot ceiling = roughly 5 feet between fixtures
However, spacing should always be adjusted based on room function, fixture output, and beam angle.
For kitchens, bathrooms, offices, and workspaces, place lighting where people actually perform tasks rather than relying solely on symmetrical layouts.
Tools You'll Need
A typical recessed downlight installation requires:
-
Stud finder
-
Tape measure
-
Pencil
-
Hole saw or drywall saw
-
Wire stripper
-
Screwdriver
-
Non-contact voltage tester
-
Ladder
-
Manufacturer's cutout template
Using the correct cutout size is critical. A hole that is too large can create costly ceiling repairs and poor fixture fitment.
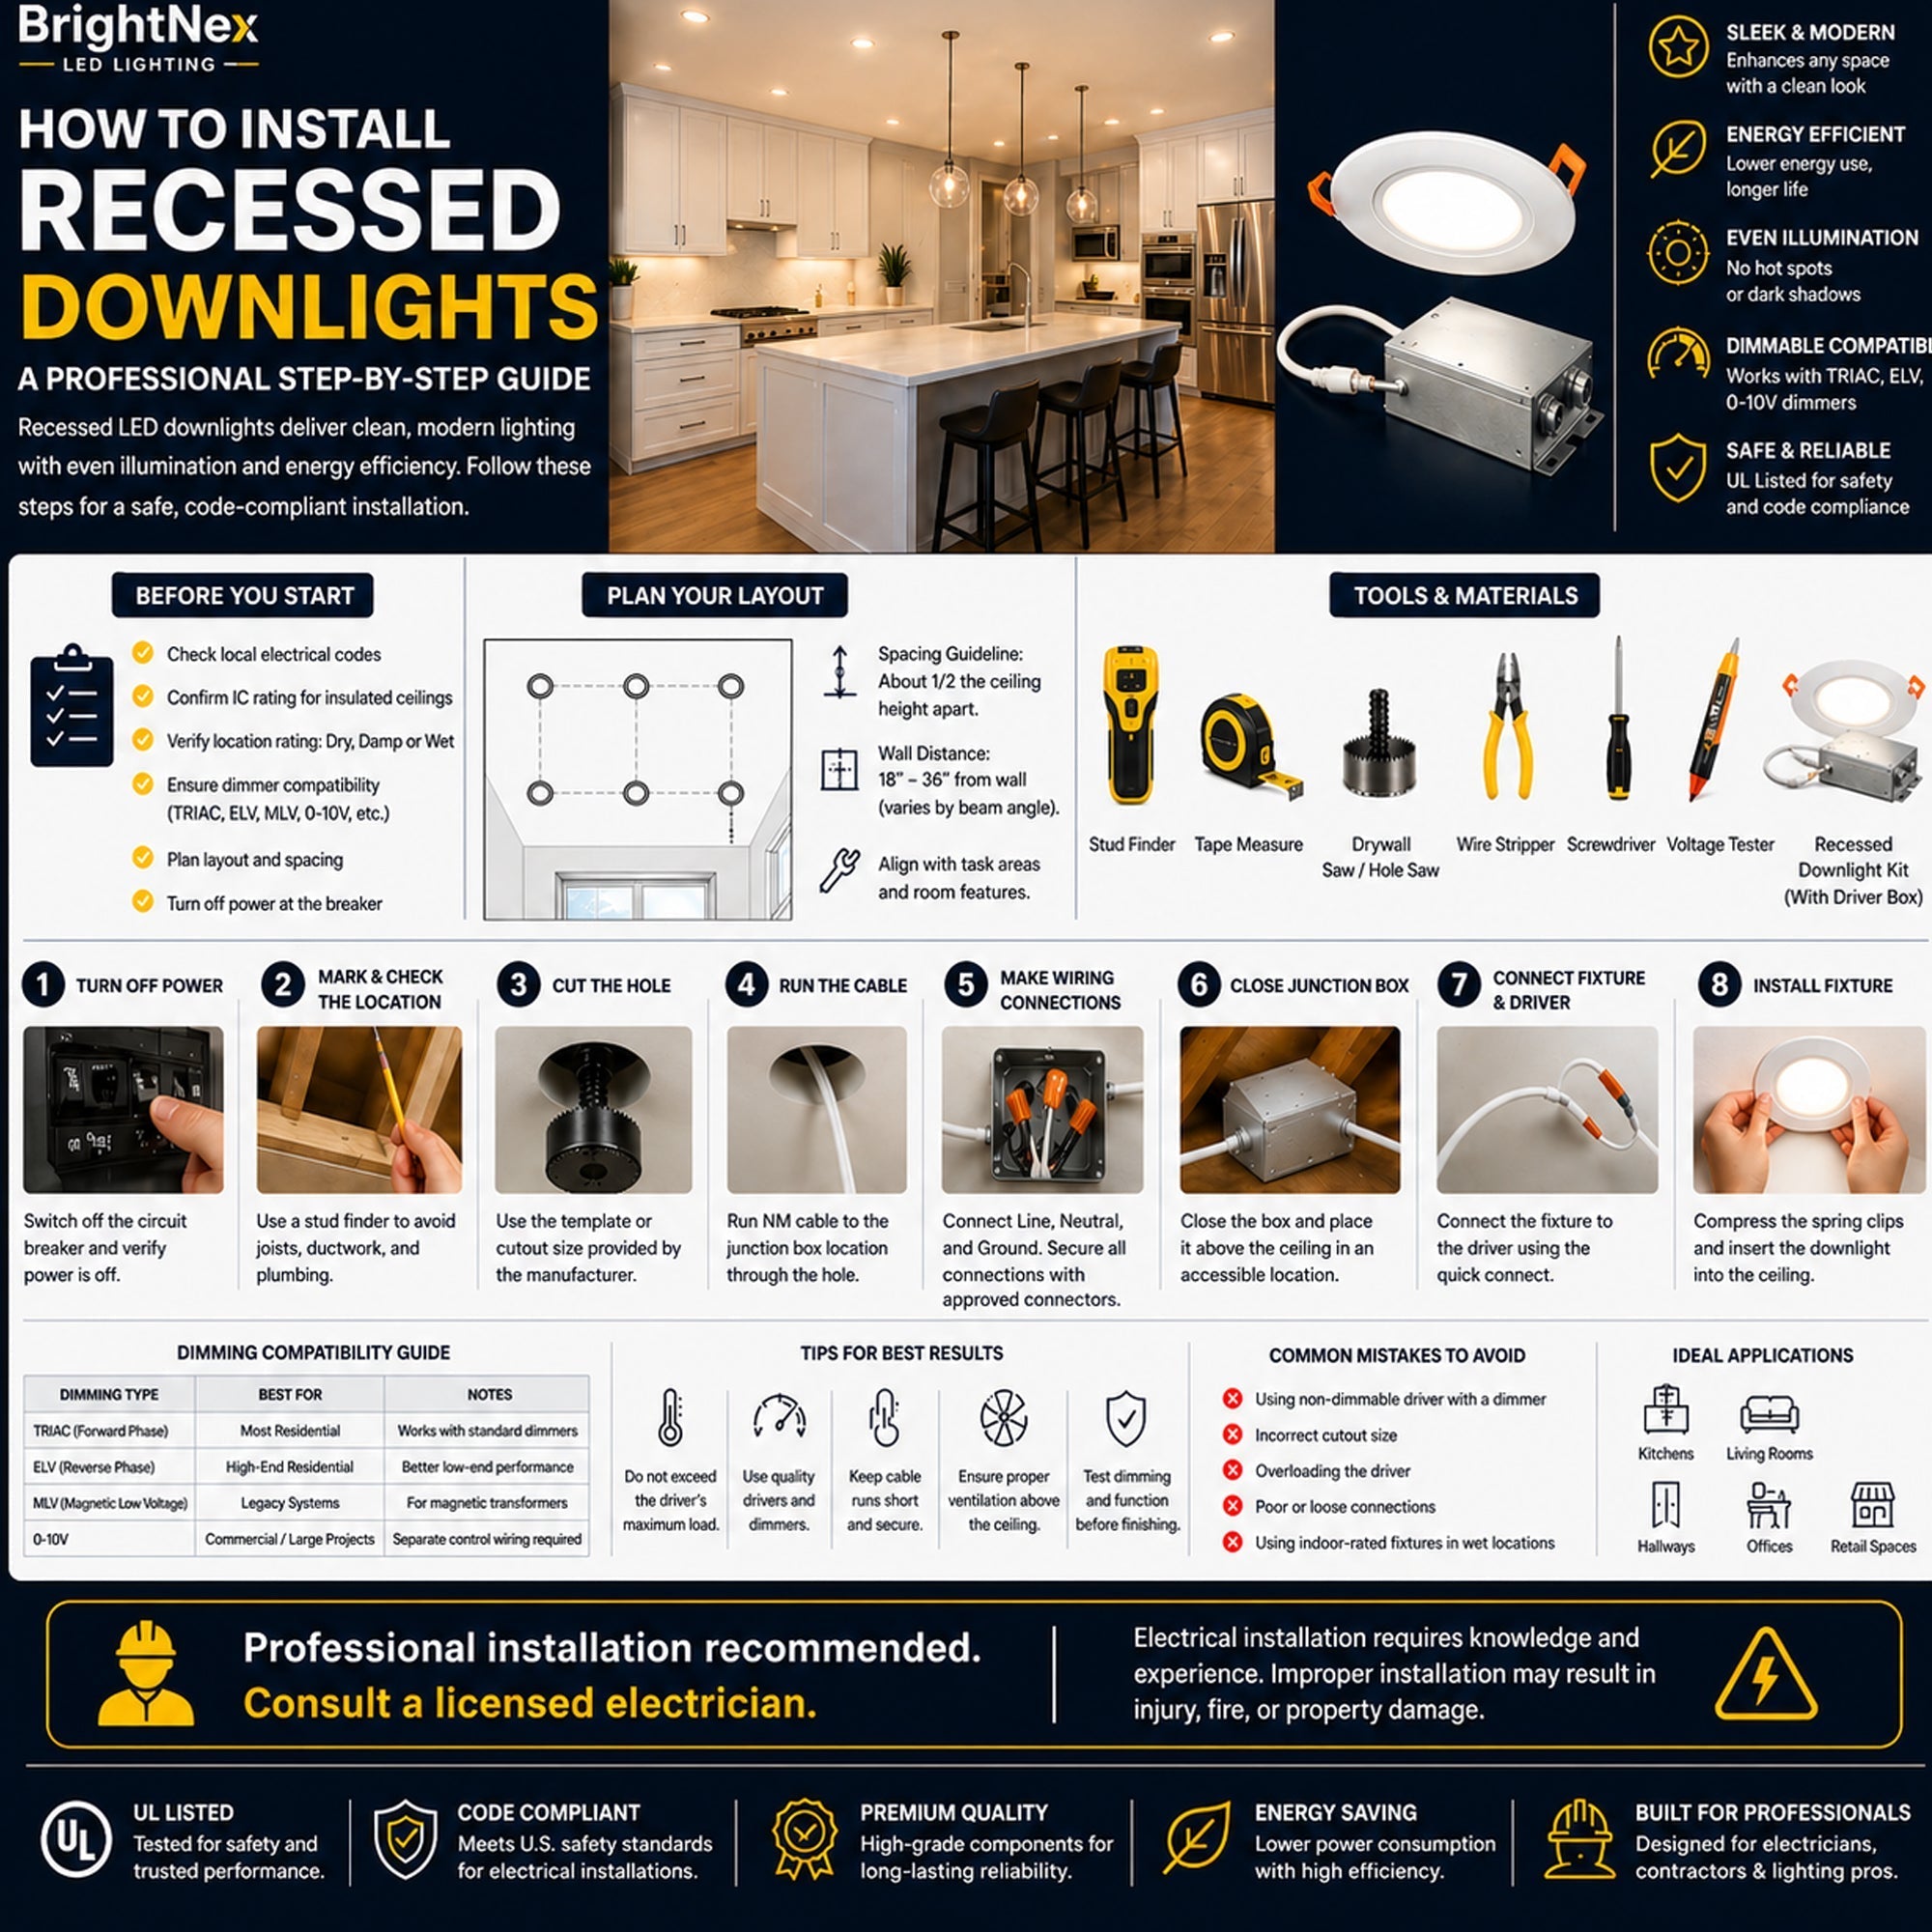
Step-by-Step Installation
1. Turn Off Power
Always switch off power at the breaker panel and verify the circuit is de-energized before beginning any electrical work.
2. Mark Fixture Locations
Use a stud finder to locate:
-
Ceiling joists
-
HVAC ductwork
-
Plumbing
-
Existing wiring
Carefully mark each fixture location before cutting.
3. Cut the Ceiling Openings
Use the manufacturer's template to create precise openings.
Take extra care when working with:
-
Textured ceilings
-
Plaster ceilings
-
Decorative finishes
Clean cuts help ensure a professional appearance once the trim is installed.
4. Run Electrical Wiring
Route wiring according to local electrical codes and manufacturer instructions.
For canless downlights with remote junction boxes:
-
Bring power into the junction box
-
Secure cables with approved connectors
-
Connect line, neutral, and ground wires
-
Close and secure the junction box cover
5. Connect the Fixture
Most modern LED downlights use a quick-connect cable between the fixture and junction box.
Ensure all connections are secure before proceeding.
6. Install the Fixture
Compress the spring clips and insert the fixture into the ceiling opening.
The trim should sit flush against the ceiling surface without gaps.
7. Restore Power and Test
Turn power back on and verify:
-
All fixtures illuminate correctly
-
Color temperature matches
-
Dimming operates smoothly
-
Trim alignment is consistent
Dimming Compatibility Matters
Many recessed lighting problems are caused by dimmer compatibility rather than fixture quality.
Common dimming methods include:
TRIAC Dimming
Often used in residential remodeling projects and compatible with many existing wall dimmers.
ELV Dimming
Provides smoother low-end dimming and improved LED performance in many premium installations.
0-10V Dimming
Common in commercial and architectural lighting projects where precise control is required.
For projects using advanced dimming systems, matching the fixture, driver, and control method is essential.
Recommended Product
For commercial and architectural applications requiring smooth, reliable dimming, explore our collection of:
0-10V Dimmable LED Drivers
https://laledlighting.com/collections/0-10v-dimmable-led-drivers
These drivers are ideal for:
-
Recessed lighting systems
-
Office lighting
-
Retail lighting
-
Hospitality projects
-
Architectural LED installations
Common Installation Mistakes
Poor Fixture Spacing
Even premium fixtures can look unprofessional when spacing is inconsistent.
Wrong Fixture Rating
Always verify:
-
IC rating
-
Damp location rating
-
Wet location rating
before installation.
Dimming Compatibility Problems
A fixture may be labeled dimmable but still perform poorly with an incompatible dimmer.
Incorrect Cutout Size
Oversized holes can create visible gaps and expensive repairs.
Ignoring Driver Requirements
Some systems require specific drivers for proper operation and smooth dimming performance.
Final Inspection Checklist
Before considering the project complete, verify:
✓ All fixtures are securely mounted
✓ Lighting is evenly distributed
✓ Color temperature is consistent
✓ Dimming works smoothly
✓ No flickering or buzzing occurs
✓ Trim sits flush against the ceiling
✓ Wiring compartments are properly closed
A properly installed recessed downlight system should disappear into the ceiling while providing comfortable, even illumination throughout the space.
Final Thoughts
Installing recessed downlights correctly starts with planning. Proper fixture placement, compatible dimming controls, quality drivers, and accurate wiring all contribute to the final result.
Whether you're upgrading a living room, kitchen, office, or commercial space, investing extra time during layout and installation helps ensure cleaner ceilings, better lighting performance, and fewer maintenance issues in the future.