
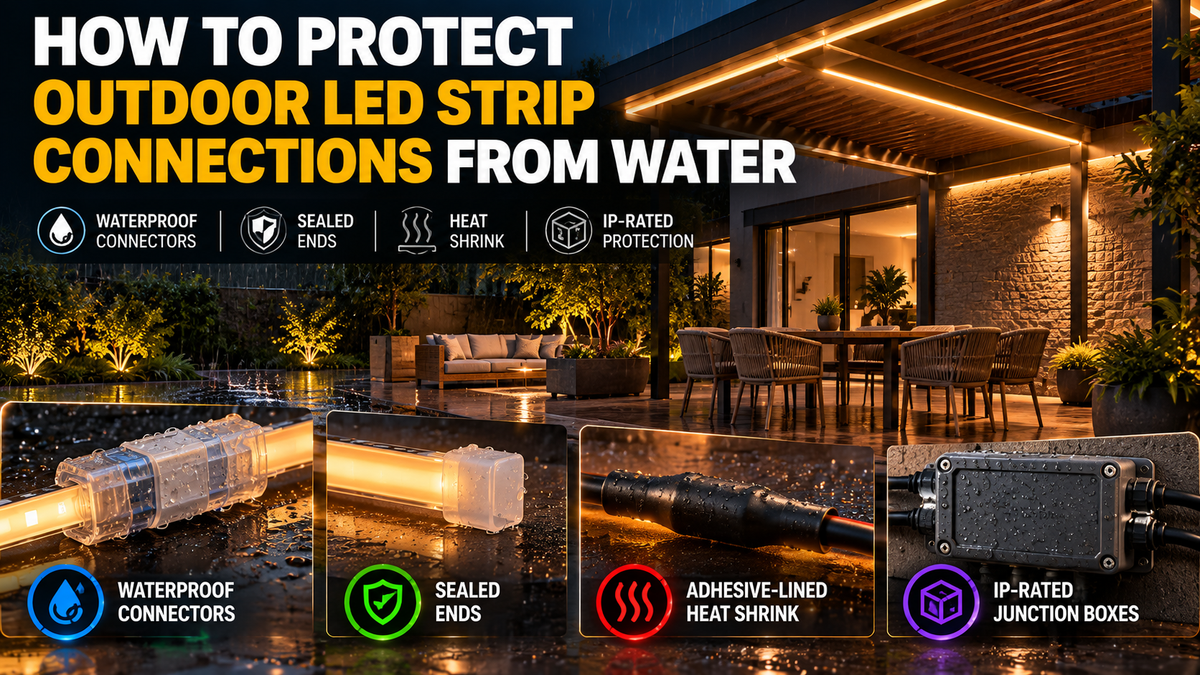
How to Protect Outdoor LED Strip Connections from Water
Outdoor LED strip lighting is an excellent way to illuminate patios, pergolas, decks, stairs, outdoor kitchens, and architectural features.
Modern waterproof COB LED strips can create beautiful, continuous lines of light while offering protection against moisture and outdoor conditions.
However, there's one important detail many people overlook:
A waterproof LED strip does not automatically mean the entire lighting installation is waterproof.
In fact, some of the most vulnerable areas in an outdoor LED lighting system are not the LED strips themselves.
They are the:
-
Electrical connections
-
Strip-to-wire joints
-
Cut ends
-
Connectors
-
Extension cables
-
LED driver connections
-
Controller connections
If these areas are not properly protected, moisture can enter the electrical system and cause corrosion, flickering, short circuits, or complete lighting failure.
The good news is that many of these problems can be prevented with the right materials and installation techniques.
Why Outdoor LED Strip Connections Need Waterproofing
Outdoor lighting systems are exposed to more than occasional rain.
Depending on the installation, they may experience:
-
Rainwater
-
Snow and melting ice
-
Condensation
-
Humidity
-
Irrigation spray
-
Temperature changes
-
Wind-driven moisture
-
Water collecting inside channels
Even if your LED strip has a waterproof coating, cutting or connecting it may expose areas that were previously protected.
For example, an IP65-rated strip may have a protective silicone coating over its LEDs.
But when you cut the strip to length, the exposed copper contacts and circuit board may no longer have the same protection.
Without proper sealing, water can reach these electrical components.
This is why waterproofing every connection is just as important as selecting the correct waterproof LED strip.
What Happens When Water Gets Into an LED Connection?
Water intrusion can create several problems.
1. Corrosion
Moisture can cause corrosion on copper contacts, connectors, and other conductive components.
Over time, corrosion increases electrical resistance and may cause intermittent operation.
2. Flickering
A wet or corroded connection may create an unstable electrical contact.
This can cause the LED strip to flicker or turn on and off unexpectedly.
3. Short Circuits
Water containing dissolved minerals or contaminants can conduct electricity between exposed contacts.
This may cause a short circuit, damage the driver, or activate electrical protection.
4. Voltage Drop
Corroded or poorly connected terminals can increase resistance, potentially contributing to reduced brightness or uneven lighting.
5. Complete Failure
If water damage becomes severe, a section of LED strip, connector, controller, or driver may stop working.
The best approach is to prevent water intrusion before these problems begin.
1. Understand LED Strip Waterproof Ratings
Before protecting connections, you need to understand the environmental rating of the LED strip itself.
An IP rating describes the level of protection an enclosure provides against solids and water under specified test conditions.
Common LED strip ratings include:
|
IP Rating |
General Protection |
Typical Consideration |
|---|---|---|
|
IP20 |
No rated water protection |
Dry indoor locations |
|
IP65 |
Protected against water jets |
Some outdoor installations |
|
IP67 |
Protected against temporary immersion under specified conditions |
More demanding wet environments |
|
IP68 |
Immersion protection under manufacturer-specified conditions |
Specialized installations |
Important: An IP rating does not automatically establish suitability for every outdoor environment.
UV exposure, temperature, chemicals, installation orientation, and the manufacturer's instructions also matter.
An IP67 LED strip is not automatically suitable for continuous underwater operation.
Likewise, an IP65 strip is not automatically suitable for every exposed outdoor installation.
Our outdoor LED strip range is IP65-rated, which covers patios, pergolas, soffits and other protected or semi-exposed locations.
The Most Important Rule
The complete installed system must be suitable for its environment—not just the LED strip.
For example:
LED Strip
Connector
Driver
Result: The complete installation is not IP67-rated. The unprotected connector and driver remain vulnerable to moisture.
Every exposed component must have appropriate protection.
This is the reason to pair an outdoor-rated strip with a driver from our IP65 transformer range rather than with an indoor unit.
2. Use Waterproof LED Strip Connectors
One of the easiest ways to improve outdoor connection protection is to use connectors specifically designed for wet environments.
Standard indoor clip-on LED connectors may be convenient, but they are not necessarily suitable for outdoor exposure.
Outdoor connectors should be selected based on:
-
Environmental rating
-
Strip width
-
Number of electrical contacts
-
Voltage and current capacity
-
Compatibility with the strip's waterproof coating
-
Manufacturer installation requirements
For example, a single-color 24V COB strip may require a two-conductor connection, while RGB, RGBW, or CCT systems may require additional conductors.
A connector designed for an 8mm strip may not properly fit a 10mm or 12mm strip.
Why Connector Fit Matters
A waterproof connector must create a reliable seal.
If the connector does not fit the strip correctly, water may enter around the edges.
This can happen when:
-
The strip is too wide
-
The silicone coating is too thick
-
The gasket is damaged
-
The connector is not fully closed
-
The cable diameter is incorrect
Always follow the connector manufacturer's compatibility and assembly instructions.
3. Protect Soldered Connections with Adhesive-Lined Heat-Shrink Tubing
For certain outdoor LED installations, soldered connections protected with suitable adhesive-lined heat-shrink tubing can provide a compact and durable connection.
Adhesive-lined heat-shrink tubing is different from ordinary heat-shrink tubing.
It contains an internal sealing adhesive that softens when heated and helps seal around the cable and joint.
General Installation Process
-
Disconnect power and confirm the circuit is de-energized.
-
Prepare the strip and conductors according to the product instructions.
-
Make the appropriate electrical connection.
-
Inspect the joint for secure electrical contact.
-
Apply a compatible, appropriately sized adhesive-lined heat-shrink sleeve.
-
Shrink it using the manufacturer's recommended heating method.
-
Inspect the finished seal.
The tubing must be compatible with the shape, materials, and environmental requirements of the joint.
Do not assume heat-shrink tubing alone makes every strip-to-wire connection waterproof. Flat LED strips, silicone jackets, and irregular shapes can require dedicated sealing accessories or an enclosure.
4. Seal Cut Ends Properly
Many waterproof LED strips can be cut at designated cutting points.
However, cutting the strip may expose:
-
Copper pads
-
Circuit board edges
-
Internal conductors
-
Protective coating boundaries
These exposed areas need suitable sealing before outdoor use.
How to Protect a Cut End
A typical manufacturer-approved sealing system may use:
Cut LED Strip → Compatible End Cap → Approved Sealant → Proper Curing
Some products use silicone end caps with sealant.
Others use molded caps, factory sealing kits, or specialized waterproof connectors.
The correct method depends on the strip construction.
One way to avoid the problem entirely is to reduce the number of field cuts. Our Outdoor Dotless COB Strip is sold in several reel lengths, so a run can often be planned to use a factory-sealed end rather than a cut one.
Why Ordinary Tape Is Not Enough
Standard electrical tape is not a reliable substitute for a properly rated outdoor seal.
Outdoor temperature changes, UV exposure, and moisture can degrade adhesive performance.
For long-term installations, use sealing methods approved for the specific strip.
5. Use the Correct Silicone Sealant
Silicone sealant can be useful for certain LED strip waterproofing applications.
But not every silicone product is suitable for electrical connections.
Some sealants release substances during curing that may contribute to corrosion on certain metals or electronic components.
For electrical applications, choose a sealant specifically identified as compatible with the materials and electronics involved.
Where specified, an appropriate neutral-cure, electronics-compatible silicone may be used.
What to Look For
Check the product information for:
-
Electrical or electronics compatibility
-
Outdoor suitability
-
UV resistance
-
Temperature range
-
Compatibility with silicone jackets and other strip materials
-
Required curing time
Avoid applying random household sealant to exposed electrical contacts.
Don't Seal Over a Bad Connection
Waterproofing cannot fix a loose or poorly made electrical joint.
The electrical connection must be correct and mechanically secure before sealing.
6. Use IP-Rated Junction Boxes
For larger outdoor LED projects, a suitable weather-resistant junction box can provide a practical way to protect cable splices and electrical connections.
A properly selected junction box can help protect connections from:
-
Rain
-
Dust
-
Moisture
-
Physical contact
-
Accidental damage
When Should You Use a Junction Box?
Consider a junction box when:
-
Multiple LED strips connect together
-
Several cables meet at one location
-
A cable branches into multiple lighting zones
-
Connections need future inspection
-
Outdoor wiring requires a protected termination point
Choose a box rated for the actual exposure conditions.
One way to reduce the number of separate boxes is to use a driver that already includes one. Our IP65 transformers with integrated junction box terminate the AC connection inside the driver's own rated enclosure, so the mains splice and the power supply share a single sealed housing instead of two.
Cable Entry Is Just as Important
Even an appropriately rated junction box can lose its intended protection if cables enter through unsealed holes.
Use compatible cable glands, fittings, or entry systems designed to maintain the enclosure's environmental rating.
7. Install Waterproof Cable Glands Correctly
Cable glands are fittings used to seal cables where they enter an enclosure.
They can help prevent water from traveling through an opening around a cable.
For example:
Outdoor Cable → Cable Gland → Junction Box → Electrical Connection
The gland should match the cable's outside diameter and the enclosure's requirements.
A cable gland that is too large may not seal properly.
One that is too small may damage the cable or fail to install correctly.
Also, a cable gland seals around the cable jacket; it does not necessarily prevent moisture from traveling inside a damaged cable.
8. Prevent Water from Running Toward Connections
Waterproofing isn't only about sealing materials.
Cable routing matters.
A poorly routed cable can direct rainwater toward a connector or enclosure.
One useful technique is creating a drip loop.
What Is a Drip Loop?
A drip loop is a downward bend in a cable before it enters an enclosure.
The cable drops below the entry point before rising toward the connection.
This encourages water traveling along the outside of the cable to drip away rather than flow directly toward the enclosure opening.
It is especially useful for:
-
Outdoor wall lighting
-
Pergola installations
-
Deck lighting
-
Garden lighting
-
Exterior architectural lighting
9. Keep Connections Away from Standing Water
Even appropriately protected connections should be located thoughtfully.
Avoid placing electrical joints where water regularly collects.
Problematic locations may include:
-
Low points inside channels
-
Areas with poor drainage
-
Directly beneath irrigation spray
-
Locations exposed to repeated pooling
-
Unprotected ground-level cavities
Whenever possible, position serviceable connections in a protected and accessible location.
Remember that an IP rating reflects specific testing conditions, not unlimited protection against every environmental exposure.
10. Protect the LED Driver Too
A common installation mistake is using waterproof LED strips with a non-weatherproof driver installed outdoors.
The LED driver converts incoming electrical power into the output required by the LED strips.
For example:
120V AC → 24V DC
If the driver is exposed to rain or condensation without suitable protection, it can fail even when the LED strips remain dry.
Outdoor Driver Options
Depending on the installation, you may use:
-
A driver specifically rated for the outdoor environment
-
An appropriately designed protective enclosure
-
A suitable dry indoor location with low-voltage wiring routed outdoors
Always follow the driver's installation instructions, including requirements for ventilation, mounting, clearance, and accessibility.
Never assume that placing an indoor driver inside a sealed plastic box makes it safe for outdoor use. Heat buildup, condensation, wiring methods, and electrical-code requirements must be considered.
For the first option, our IP65-rated transformers run from 60W to 384W in 12V and 24V — the 60W for a small accent run, the 96W 24V for a typical patio, and the 384W 4-Channel where several outdoor zones need separate feeds from one rated enclosure.
11. Don't Forget the LED Controller
If you're using RGB, RGBW, CCT, or addressable LED strips, the controller is another component that needs protection.
A typical system might be:
Power Supply → LED Controller → Outdoor LED Strip
Even if the driver and strip are properly rated, an indoor-only controller can remain a weak point.
Check the controller's:
-
IP rating
-
Operating temperature range
-
Environmental suitability
-
Connector protection
-
Cable-entry requirements
For outdoor installations, use an appropriately rated controller or a suitable approved enclosure.
This is worth checking carefully: most LED controllers, including those in our controllers and remotes range, are indoor-rated units. For an outdoor colour-changing installation, plan to locate the controller inside a protected enclosure or in a dry interior space with only the low-voltage output running outdoors.
12. Use Outdoor-Rated Cables
The cable connecting your LED strips is also important.
Outdoor cables may need to withstand:
-
Moisture
-
Sunlight
-
Temperature fluctuations
-
Physical abrasion
-
Installation-specific environmental conditions
Select cable with appropriate ratings for the installation method and environment.
Cable size also matters.
Long low-voltage runs can experience voltage drop, particularly when carrying higher current.
Waterproofing and electrical sizing are separate requirements; both need to be correct.
Where a run is long enough that low-voltage cable becomes the limiting factor, a line-voltage product such as the 100ft 110V IP65 COB Strip avoids the low-voltage distribution problem altogether.
13. Consider UV Exposure
Outdoor lighting is exposed to sunlight, which can degrade certain plastics, adhesives, and protective coatings over time.
A connector may resist water but still deteriorate if its materials are not suitable for long-term UV exposure.
Check whether the selected:
-
Cable jacket
-
Connector
-
Sealant
-
Heat-shrink tubing
-
Junction box
-
LED strip coating
is suitable for the expected sunlight exposure.
UV resistance is especially important for installations on pergolas, exterior walls, decks, and exposed architectural surfaces.
14. Temperature Changes Can Affect Seals
Outdoor lighting experiences temperature changes throughout the year.
Materials expand and contract as temperatures change.
This movement can place stress on:
-
Connectors
-
Sealants
-
Cable glands
-
Adhesive joints
-
End caps
Poorly selected or incorrectly installed sealing materials may eventually develop gaps.
Choose products rated for the expected temperature range and inspect exposed installations periodically.
15. Protect Connections Inside Aluminum Channels
Aluminum LED channels are popular for outdoor architectural lighting because they can provide a clean appearance and help with mounting and heat spreading.
However, an aluminum channel is not automatically waterproof.
Even when a channel has a diffuser, water may enter through:
-
Channel ends
-
Mounting holes
-
Joints
-
Gaps around the diffuser
-
Cable-entry points
If the channel is used outdoors, the entire assembly must be appropriate for that environment.
Avoid Trapping Water
Water entering a channel should not be allowed to accumulate around electrical connections.
Use a manufacturer-approved installation approach that accounts for sealing, drainage, orientation, and thermal performance.
Do not block necessary drainage paths with excessive sealant.
16. Be Careful with Waterproof COB LED Strips
Waterproof COB LED strips are an excellent choice for many outdoor architectural lighting projects because they provide a smooth, continuous-looking light source.
Common applications include:
-
Pergola lighting
-
Patio accents
-
Outdoor kitchen lighting
-
Deck features
-
Architectural coves
-
Exterior wall details
However, waterproof COB strips still need correctly protected connections.
The strip's waterproof coating does not necessarily protect a field-made connection or newly cut end.
Every application in that list is what our Outdoor Dotless COB LED Strip (8mm) is built for — IP65-rated, dot-free, and dimmable with a compatible driver.
COB-Specific Considerations
Check whether the manufacturer permits:
-
Field cutting
-
Field soldering
-
Connector installation
-
Re-sealing
-
Installation inside channels
Some encapsulated strips require specialized accessories.
Follow the manufacturer's instructions to preserve the intended environmental protection.
17. Don't Rely on Hot Glue
Hot glue is sometimes used as a quick way to cover LED connections.
But ordinary craft hot glue is not a reliable long-term waterproofing method for outdoor electrical joints.
Temperature changes, moisture, and adhesion limitations can cause the seal to fail.
Use properly specified electrical sealing products instead.
18. Avoid Ordinary Electrical Tape as the Only Protection
Electrical tape has legitimate uses when selected and applied correctly, but ordinary tape alone should not be treated as a guaranteed waterproof enclosure.
Outdoor moisture and temperature changes can affect adhesion.
For exposed LED strip joints, use a manufacturer-approved waterproof connection system.
That may include an appropriate connector, sealing kit, adhesive-lined heat-shrink product, or rated enclosure.
19. Don't Assume IP67 Means Everything Can Be Submerged
IP67 describes a specified temporary-immersion test.
It does not mean the product is automatically suitable for:
-
Continuous underwater operation
-
Pool or fountain installations
-
Saltwater environments
-
Pressurized washing
-
Every outdoor exposure condition
Likewise, a waterproof LED strip may lose its original environmental protection when modified.
For fountains, pools, or other specialized wet locations, use products specifically listed or rated for those applications and follow applicable electrical requirements.
Our outdoor strips are IP65 — rated against water jets, not immersion — so they suit pergolas, soffits, decks and patios rather than submerged or pool applications.
20. Test Connections Before Final Installation
Before completing an outdoor LED strip project, inspect the entire system.
Confirm that:
-
Electrical connections are secure
-
Strip polarity is correct
-
Voltage matches the driver
-
Cable sizes are appropriate
-
Connections have suitable environmental protection
-
Cut ends are sealed
-
Enclosures are properly closed
-
Cable glands are installed correctly
-
Drivers and controllers are suitable for the location
Power the system and verify normal operation before closing accessible enclosures.
Any moisture-resistance testing should follow the product manufacturer's approved procedure. Do not spray, soak, or immerse a newly wired system to test it unless that procedure is explicitly supported.
21. Common Outdoor LED Waterproofing Mistakes
Here are some of the most common mistakes to avoid.
|
Mistake |
Why It Causes Problems |
|---|---|
|
Using indoor connectors outdoors |
Water can enter exposed contacts |
|
Leaving cut ends unsealed |
Moisture reaches copper pads |
|
Using ordinary tape alone |
Seal may degrade |
|
Using the wrong connector width |
Poor fit can compromise sealing |
|
Installing an indoor driver outdoors |
Driver may be exposed to moisture |
|
Ignoring cable glands |
Water can enter enclosures |
|
Allowing water to pool |
Prolonged exposure stresses seals |
|
Using unsuitable silicone |
May damage materials or corrode contacts |
|
Ignoring UV resistance |
Outdoor materials may deteriorate |
|
Hiding joints permanently |
Inspection and repair become difficult |
|
Assuming the entire system has the strip's IP rating |
Other components may have lower protection |
The best outdoor installation is one where every component is selected as part of a complete system.
22. Example: Outdoor Pergola COB Lighting
Imagine you're installing 24V waterproof COB LED strips around a pergola.
The system includes:
24V COB LED Strips
24V LED Driver
Low-Voltage Cables
Connectors
Aluminum Channels
Dimmer or Controller
A good installation plan should consider the following.
LED Strips
Select a strip suitable for the expected outdoor exposure — for a pergola, the Outdoor Dotless COB Strip.
Connections
Use compatible waterproof connection accessories and approved sealing methods.
Driver
Install a driver rated for the location, or locate it in a suitable protected area. The 96W 24V IP65 Transformer covers a typical pergola run.
Wiring
Use appropriate cable and routing to reduce water exposure and voltage drop.
Channels
Use channels suitable for the outdoor environment and install them according to the manufacturer's instructions.
Controls
Ensure any controller or dimmer is compatible with the driver and protected appropriately.
Maintenance
Keep serviceable connections accessible for inspection and repair.
This approach helps protect the complete lighting system instead of focusing only on the LED strip.
23. Example: Outdoor Kitchen Under-Cabinet Lighting
Outdoor kitchens are another excellent application for COB LED strips.
The lighting may be installed under:
-
Cabinets
-
Shelves
-
Countertop overhangs
-
Pergola structures
Although some areas are sheltered from direct rain, they may still experience humidity, condensation, cleaning spray, or wind-driven moisture.
Choose the strip, connections, channels, and driver based on the actual exposure.
For example, a connection hidden beneath an outdoor cabinet may still require moisture protection even if it is not directly exposed to rainfall.
This is a case where the IP65 strip and an IP65 driver are both worth using even though the location looks sheltered.
24. Example: Deck and Stair Lighting
Deck and stair lighting can be exposed to rain, snow, dirt, and cleaning water.
Connections located near the ground may experience more frequent moisture exposure than elevated architectural lighting.
For these applications:
-
Use appropriate outdoor-rated lighting products
-
Protect cut ends
-
Avoid low points where water collects
-
Secure wiring against movement and abrasion
-
Use suitable enclosures and connectors
-
Keep serviceable connections accessible
Where lighting is used for safe navigation, the installation should also provide reliable illumination and comply with applicable requirements.
Because stair runs involve many short segments and therefore many connections, keeping the driver at one protected end — a 60W IP65 transformer is often enough for a flight of stairs — reduces the number of exposed joints.
25. How to Maintain Outdoor LED Strip Connections
Even a properly installed outdoor lighting system benefits from periodic inspection.
Check for:
-
Cracked seals
-
Damaged cable jackets
-
Loose connectors
-
Corrosion
-
Discoloration
-
Water inside channels
-
Damaged end caps
-
Unusual flickering
-
Intermittent operation
Inspect after severe weather or when you notice a change in performance.
Before opening or repairing electrical connections, disconnect power and confirm the system is de-energized.
If water has entered a driver, controller, or electrical enclosure, do not simply turn the system back on. Have the affected components evaluated and replaced where necessary.
26. What Should You Do If Water Gets Into an LED Connection?
If you suspect water intrusion:
-
Turn off power to the system.
-
Do not touch exposed or wet electrical parts while energized.
-
Identify the affected section once it is safe to inspect.
-
Check for corrosion, damaged insulation, or compromised seals.
-
Replace damaged connectors or other components as needed.
-
Rebuild the connection using a suitable waterproofing method.
-
Verify the installation before restoring power.
Do not assume that drying a corroded connector automatically makes it safe or reliable again.
For permanent outdoor electrical wiring, use a qualified electrician when required.
If the driver itself has taken on water, it should be replaced rather than dried and reused.
27. How Long Should Waterproof LED Connections Last?
There is no single guaranteed lifespan.
Connection durability depends on:
-
Connector quality
-
Environmental exposure
-
Seal materials
-
Installation technique
-
Temperature
-
UV exposure
-
Maintenance
-
Cable movement
-
Water drainage
A correctly installed connection using suitable components can provide reliable service for years, but outdoor exposure requires periodic inspection.
The goal is to prevent premature failures by selecting and installing the right components from the beginning.
Quick Outdoor LED Waterproofing Checklist
Installation readiness
0 of 10 checked
For the first and eighth items, start with our outdoor LED strips and IP65 transformers.
Final Thoughts
So, how do you protect outdoor LED strip connections from water?
The answer is to protect the complete electrical system—not just the LED strip.
Even a waterproof COB LED strip can fail when water enters through an exposed connection, damaged end cap, or improperly sealed cable joint.
For reliable outdoor LED lighting, focus on:
Waterproof Connectors
Properly Sealed Cut Ends
Suitable Heat-Shrink and Sealants
IP-Rated Junction Boxes
Correct Cable Glands
Water-Smart Cable Routing
Outdoor-Suitable Drivers and Controllers
And most importantly:
Match every component to the environment where it will be installed.
A well-planned outdoor LED system can provide beautiful architectural lighting while reducing the risk of premature failures caused by moisture.
You can compare the rated components in one place: outdoor LED strips and IP65 transformers with integrated junction box.
FAQ
Are waterproof LED strip connectors really waterproof?
They can provide water protection when properly rated, compatible with the strip and cable, and installed according to the manufacturer's instructions. Not every connector is suitable for every outdoor exposure.
Can I use regular electrical tape to waterproof LED connections?
Ordinary electrical tape alone should not be relied upon as a long-term waterproofing solution for exposed outdoor LED connections.
Can I use silicone to waterproof LED strip connections?
Yes, when the strip manufacturer specifies an appropriate silicone sealing method. Use a compatible electrical-grade product and follow the required preparation and curing instructions.
Is adhesive-lined heat-shrink tubing waterproof?
It can provide a moisture-resistant seal on compatible joints when installed correctly, but it does not automatically make every type of LED strip connection waterproof.
Do IP65 LED strips need waterproof connectors?
Yes, if the connections will be exposed to moisture. The strip's IP rating does not automatically protect field-made connections or cut ends.
Is IP67 better than IP65 for outdoor LED strips?
IP67 provides a different, specified level of water protection, including temporary immersion testing. The correct rating depends on the installation and manufacturer's environmental requirements. Our outdoor strips are IP65, which suits pergolas, decks, soffits and patios.
Can an outdoor LED driver get wet?
Only if it is specifically designed and rated for the expected exposure. Many LED drivers are intended for dry or otherwise protected locations — see our IP65-rated range for units built for outdoor use.
How do I waterproof the end of a cut LED strip?
Use the manufacturer's approved end cap, sealing kit, or other specified sealing method. The correct approach depends on the strip's construction.
Can water inside an LED channel damage the strip?
Yes. Water entering a channel can reach exposed connections or damaged protective coatings. The channel assembly must be suitable for the outdoor environment.
Why do my outdoor LED strips flicker after rain?
Moisture intrusion, corrosion, or a compromised connection may be responsible. Disconnect power and inspect the system safely before attempting repairs.
Can I install outdoor LED strip connections underground?
Only using components and wiring methods specifically suitable for direct burial or the applicable underground installation conditions. Standard waterproof connectors should not automatically be considered suitable for burial.
Should outdoor LED connections be accessible?
Serviceable electrical connections should remain accessible as required by the product instructions and applicable electrical codes.