LED Driver Troubleshooting Guide
Flickering lights, buzzing drivers, dimming issues, or LEDs that suddenly shut off are often traced back to the power supply side of the system. This LED driver troubleshooting guide helps contractors, electricians, and homeowners identify problems quickly and avoid replacing parts unnecessarily.
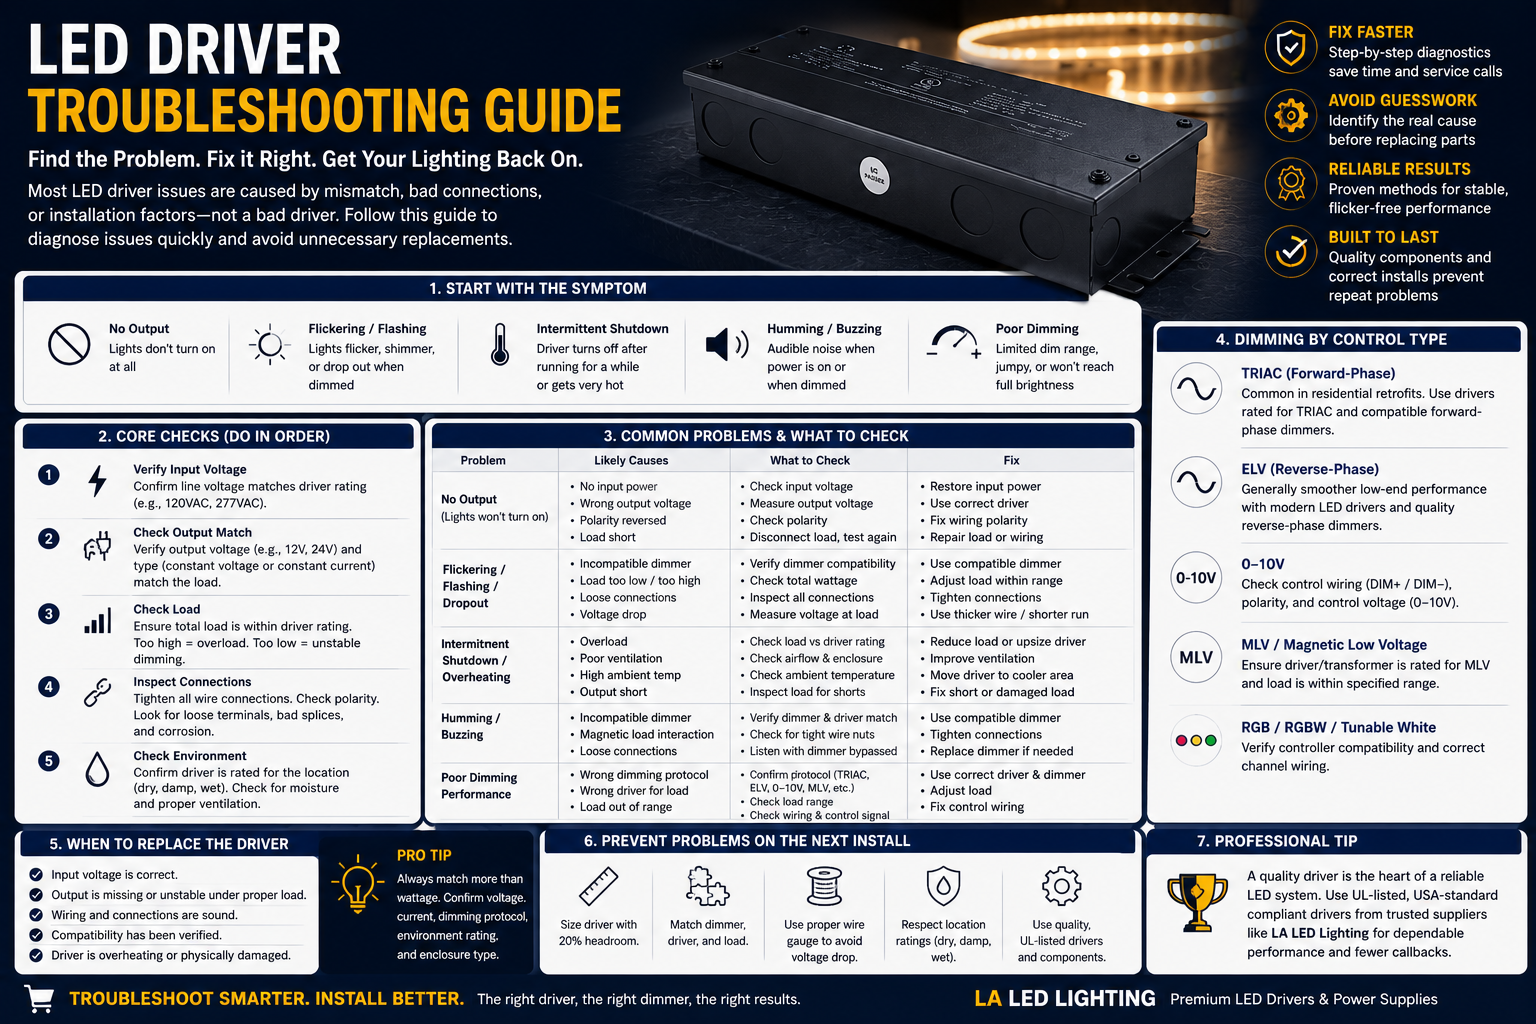
Many LED driver issues are not actually driver failures. Incompatible dimmers, overloaded circuits, poor wiring connections, voltage drop, or incorrect driver selection are often the real cause.
Start With the Symptom
The fastest way to troubleshoot is to identify exactly what the lighting system is doing.
Common symptoms include:
- Lights won't turn on
- Flickering or flashing LEDs
- Driver humming or buzzing
- Lights shutting off after a few minutes
- Poor dimming performance
- Uneven brightness
Each symptom points toward a different cause, so avoid replacing the driver until you've checked the basics.
Check the Core Components First
Before replacing anything, verify:
- Input voltage matches the driver rating
- Driver output matches the LED load
- Wiring connections are secure
- Polarity is correct
- Total load is within driver capacity
- Dimming controls are compatible
Remember that constant voltage and constant current drivers are not interchangeable.
A 24V LED strip requires a 24V constant-voltage driver, while many downlights and fixtures require a constant-current driver with specific output ratings.
LEDs Won't Turn On
If there is no light output:
- Verify power is reaching the driver.
- Check the circuit breaker.
- Measure input voltage with a meter.
- Confirm output voltage at the driver.
- Inspect wiring and polarity.
If the driver receives power but produces no output, disconnect the load and test again. If output returns, the issue may be downstream in the fixture, strip light, or wiring.
Flickering or Flashing Lights
Flickering is one of the most common LED complaints.
Possible causes include:
- Incompatible dimmer
- Overloaded driver
- Loose wiring connections
- Voltage drop
- Poor connectors
- Incorrect driver selection
If flickering only happens when dimming, the dimmer and driver may not be compatible.
For LED strip lighting, also check long wire runs and connection points, as voltage drop can create flickering or uneven brightness.
Driver Humming or Buzzing
Buzzing is often caused by dimming compatibility problems.
Check:
- TRIAC compatibility
- ELV compatibility
- Load requirements
- Driver specifications
Many older dimmers were designed for incandescent lighting and do not perform well with modern LED drivers.
Replacing the dimmer often solves the problem without replacing the driver.
Driver Overheating or Shutting Down
A driver that works for several minutes and then shuts off is usually entering protection mode.
Common causes include:
- Overloading
- Poor ventilation
- High ambient temperatures
- Driver installed in a confined space
- Partial short circuits
Drivers should always have adequate airflow and should not operate continuously at maximum capacity.
For best performance, leave capacity headroom when sizing a driver.
Dimming Problems
TRIAC and ELV Systems
These are common in residential installations.
Problems may include:
- Flickering
- Dead travel on the dimmer
- Lights not reaching full brightness
- Dropout at low levels
Often the issue is dimmer compatibility rather than driver failure.
0-10V Systems
Common in commercial applications.
Check:
- Control wiring
- Polarity
- Low-voltage control connections
- Dimmer voltage output
Many 0-10V problems are caused by wiring errors rather than defective drivers.
When Should You Replace the Driver?
Replace the driver if:
- Input voltage is correct
- Wiring is verified
- Load is within specification
- Dimming compatibility has been confirmed
- Output remains unstable or missing
At that point, replacing the driver is usually more efficient than continued troubleshooting.
Choosing the Correct Replacement Driver
When replacing a driver, match:
- Constant voltage or constant current type
- Output voltage
- Output current
- Wattage capacity
- Dimming protocol
- Environmental rating
Do not choose a replacement based solely on wattage or physical appearance.
Recommended Product
For reliable dimming performance and professional installations, explore:
0-10V Dimmable LED Drivers
https://laledlighting.com/collections/0-10v-dimmable-led-drivers
These drivers are designed for smooth dimming, commercial applications, architectural lighting, and premium residential projects.
How to Prevent Future Driver Problems
Most driver issues can be avoided by:
- Proper driver sizing
- Matching voltage correctly
- Using compatible dimmers
- Leaving wattage headroom
- Providing adequate ventilation
- Choosing UL-certified components
- Using the correct driver for damp or wet locations
For LED strip lighting, careful planning of wire runs and voltage drop is equally important.
Final Thoughts
Successful LED driver troubleshooting starts with identifying the symptom rather than assuming the driver has failed. Many lighting problems are caused by compatibility issues, wiring mistakes, dimming conflicts, or overload conditions rather than defective hardware.
By checking voltage, load, wiring, and dimming compatibility in a logical order, you can solve most LED driver issues quickly and avoid unnecessary replacements. When replacement is necessary, choose a properly matched driver that supports the lighting system and installation environment for long-term reliable performance.