Why Won't My LED Strip Turn On?
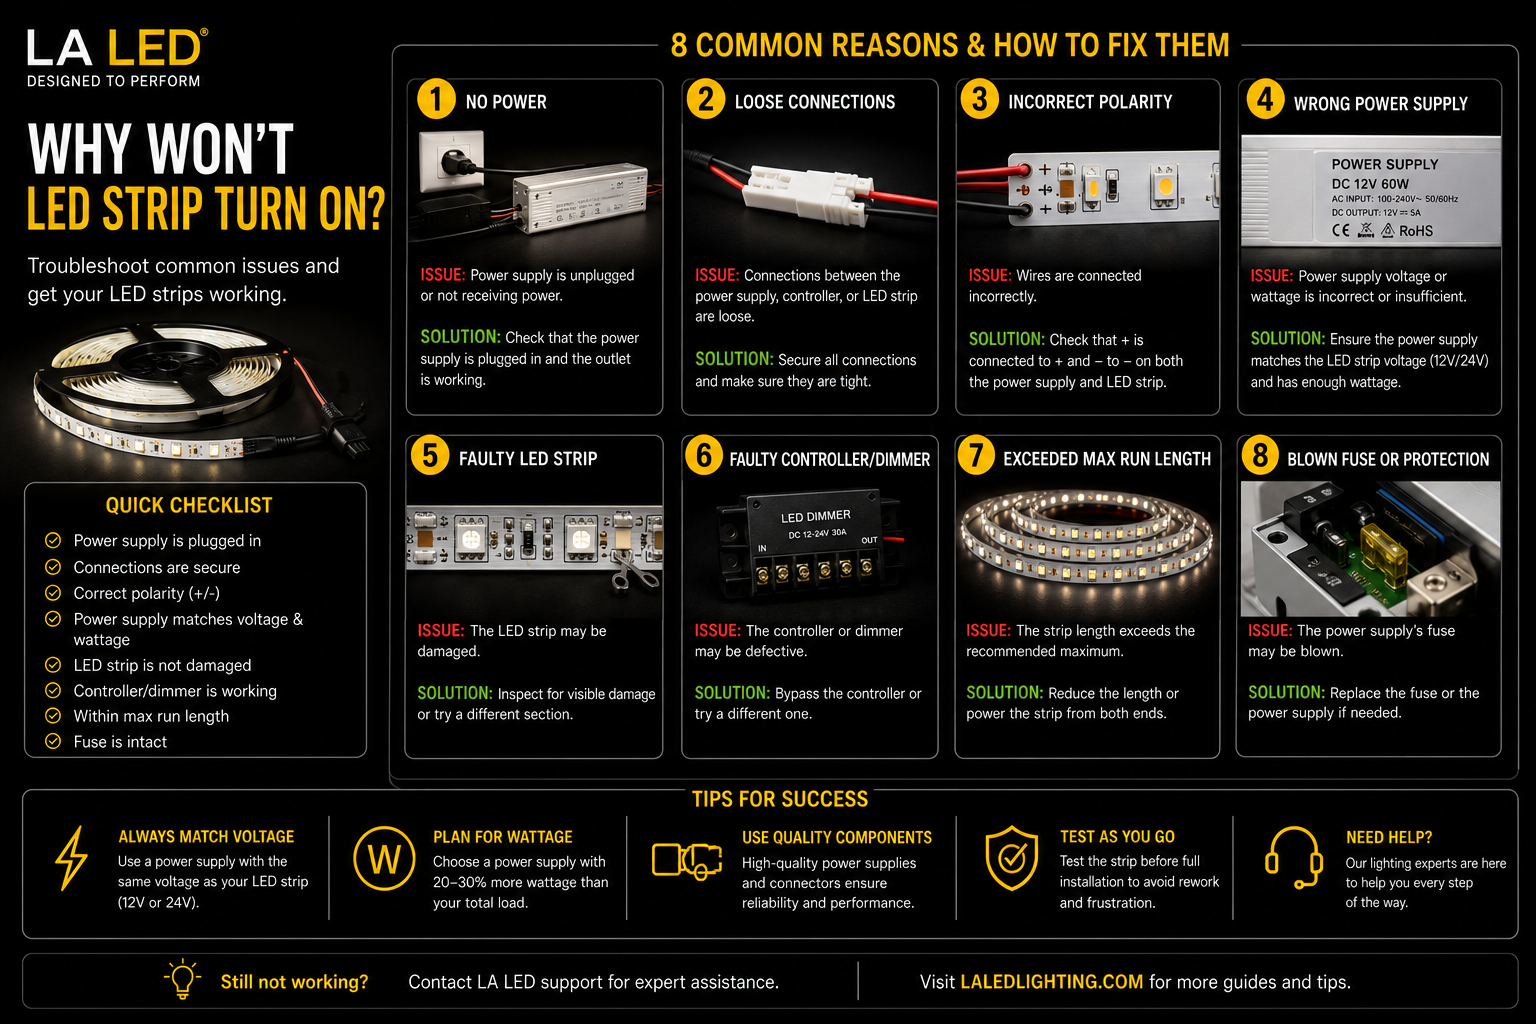
You connect the power supply, flip the switch, and nothing happens. If you're asking why your LED strip won't turn on, the good news is that the strip itself is rarely the problem. Most startup issues are caused by power supply problems, wiring mistakes, polarity errors, or incompatible components.
Because LED strip lighting is a complete system, every part must work together correctly. The strip, driver, transformer, controller, dimmer, connectors, and wiring all play a role. If one component is mismatched or connected incorrectly, the entire system can stay dark.
Start With the Power Supply
The most common reason an LED strip won't turn on is a power issue.
First, verify that the driver or transformer matches the strip voltage.
For example:
- 12V LED strip = 12V DC driver
- 24V LED strip = 24V DC driver
A 24V strip connected to a 12V driver may not light at all. Likewise, a low-voltage strip connected directly to line voltage can be permanently damaged unless it is specifically designed for 120V operation.
Also check the driver's wattage capacity. If the connected load exceeds the driver's rating, it may shut down or fail to start.
Quick Test
Disconnect any dimmers or controllers and connect the strip directly to a compatible power supply.
If the strip turns on, the issue is likely in the control system rather than the strip itself.
Check Polarity
LED strips are polarity-sensitive.
Positive must connect to positive, and negative must connect to negative.
Reversed polarity is one of the most common installation mistakes, especially when:
- Using quick connectors
- Extending wire runs
- Installing RGB or RGBW strips
- Reconnecting cut sections
If polarity is reversed, many strips simply won't turn on.
Inspect Every Connection
A connector can appear secure while still failing electrically.
Common connection problems include:
- Loose terminals
- Poor solder joints
- Misaligned strip connectors
- Damaged copper pads
- Incomplete wire insertion
If the strip was cut and reconnected, inspect that location carefully. A single bad connection can stop power from reaching the entire run.
For outdoor or damp-location installations, moisture intrusion and corrosion can also create connection failures.
Controller Compatibility Problems
If you're using RGB, RGBW, or tunable-white lighting, controller compatibility becomes critical.
Examples include:
- RGB strips require RGB controllers
- RGBW strips require RGBW controllers
- Tunable-white strips require CCT controllers
Using the wrong controller may prevent the strip from operating altogether.
The same applies to dimmers. If the driver and dimmer use incompatible protocols, the system may fail to start, flicker, or behave unpredictably.
Why Won't My LED Strip Turn On After Cutting?
If the strip stopped working after being cut, start by checking the cut location.
LED strips can only be cut at designated cut marks. Cutting between those points can damage the circuit and prevent operation.
Even when cut correctly, damaged copper pads can prevent connectors from making proper contact.
If only one section is dark, the issue is usually at the nearest cut or splice point. If the entire strip stopped working after modification, inspect the first connection back to the power source.
Check the Input Power
Sometimes the problem has nothing to do with the LED strip.
Verify that:
- The breaker is on
- The wall switch is working
- GFCI outlets have not tripped
- Line voltage is reaching the driver
A failed switch leg or loose junction box connection can make it appear that the strip has failed when the driver simply isn't receiving power.
Heat and Load Issues
Some strips briefly turn on and then shut off.
This often points to:
- Driver overload
- Thermal protection
- Poor ventilation
- Voltage drop
- Failing power supplies
Long strip runs without proper power distribution can also cause sections to appear dead or extremely dim.
If the strip lights for a few seconds and then shuts down, focus on the driver and power supply first.
When the Strip Is Actually Bad
Although less common, the strip itself can fail.
Possible causes include:
- Shipping damage
- Physical damage during installation
- Overvoltage
- Water intrusion
- Excessive heat exposure
Visible burn marks, damaged traces, or crushed sections usually indicate that replacement is necessary.
The Fastest Troubleshooting Process
Rather than replacing random components, work through the system in order:
- Confirm power is reaching the driver.
- Verify driver output voltage.
- Confirm the strip voltage matches the driver.
- Check polarity.
- Bypass controllers and dimmers.
- Inspect connectors and cut points.
- Test a short section directly from a known-good power supply.
This process quickly identifies whether the problem is the strip, driver, controller, or wiring.
Final Thoughts
If your LED strip won't turn on, the issue is usually somewhere in the power chain rather than the strip itself. Most problems come down to incorrect voltage, reversed polarity, poor connections, incompatible controllers, or driver issues.
The best way to avoid troubleshooting headaches is to build the system correctly from the start. Match voltage requirements, use compatible drivers and controls, verify wiring connections, and choose quality components designed to work together.
When every part of the system is properly matched, LED strip lighting should power on reliably, dim smoothly, and perform consistently for years.