A driver that is too small usually fails the same way every job does - flicker, dropout, heat, or a callback you did not need. A driver that is too large can also create problems, especially when dimming, low-load behavior, or enclosure space is part of the project. If you are figuring out how to size LED driver equipment correctly, the goal is simple: match the electrical requirements of the LED load, then leave enough headroom for reliable operation.
For contractors and homeowners alike, the mistake is rarely in the math. It is usually in missing one detail - constant voltage versus constant current, incompatible dimming, wet-location requirements, or a long tape run that changes the real load. Good sizing starts with the fixture or strip light specs, not with the driver.
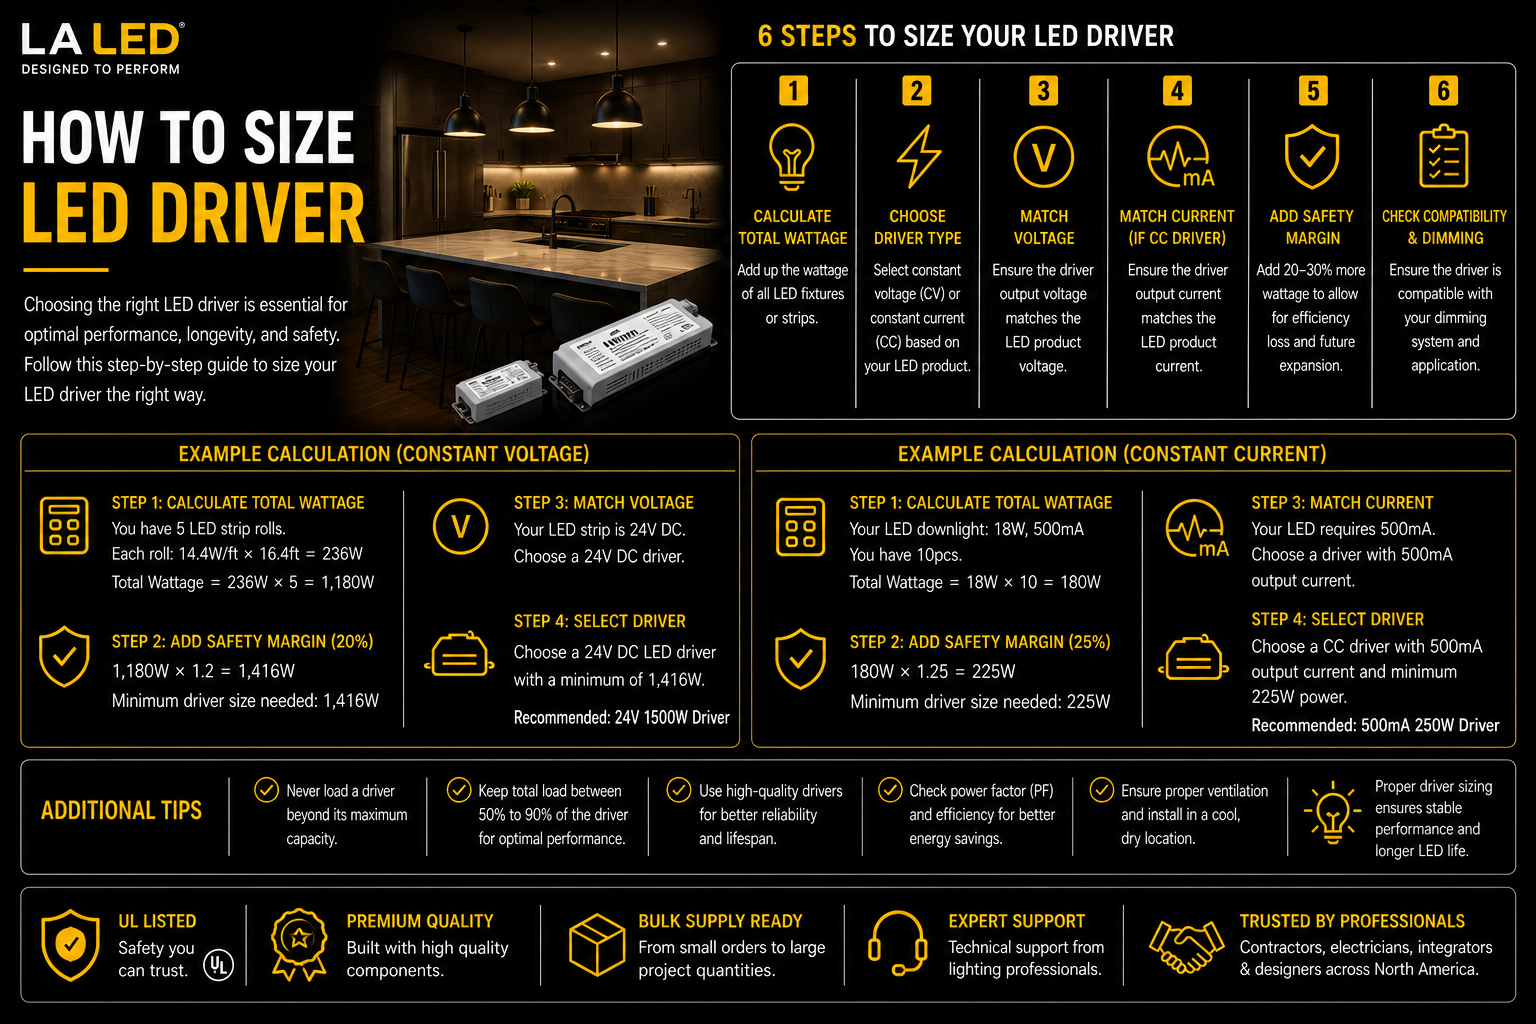
How to size LED driver the right way
Start with the type of LED product you are powering. Most LED strip lights use constant voltage drivers, typically 12VDC or 24VDC. Many LED downlights, modules, and specialty fixtures use constant current drivers, such as 350mA, 500mA, 700mA, or higher. These are not interchangeable.
A constant voltage driver holds the output voltage steady and lets the LED product draw the current it needs. A constant current driver regulates current and allows voltage to vary within a stated range. If the LED load calls for 24V constant voltage, a 700mA constant current driver is the wrong product even if the wattage looks close on paper.
The label or specification sheet should tell you four things: required voltage or current, total wattage, dimming method, and installation rating. Once those match, sizing becomes straightforward.
Step 1: Match the output type
This is the first filter. If the LED load is rated 12VDC or 24VDC, choose a constant voltage driver with that exact output. If the fixture is rated by current, choose a constant current driver with the exact output current and a voltage range that covers the fixture.
For example, a 24V COB strip needs a 24V constant voltage driver. A recessed fixture labeled 700mA with a forward voltage range of 18-36V needs a 700mA constant current driver whose output voltage range includes 18-36V.
There is no safe shortcut here. Matching wattage without matching output type will not give reliable performance.
Step 2: Calculate the total load
For constant voltage systems, add up the total wattage of all connected lighting on that driver. If your strip light is rated at 4.4 watts per foot and the run is 16 feet, the total load is 70.4 watts.
For multiple runs on one driver, add each section together. If you are powering three 8-foot runs of 24V tape at 5 watts per foot, the total is 120 watts.
For constant current fixtures, the current is fixed by the driver, so sizing is more about making sure the fixture's forward voltage falls within the driver's output range. If several fixtures are wired in series on a constant current driver, add the forward voltage of each fixture and confirm the total stays within the driver's rated range.
Leave headroom instead of maxing out the driver
Once you know the actual load, do not size the driver at the exact number unless the manufacturer specifically allows it and the application is tightly controlled. A practical rule is to add 20 percent headroom.
If your strip light load is 70.4 watts, multiply by 1.2. That gives 84.48 watts, so you would move up to the next standard driver size, typically 96W or 100W depending on the product line. If the load is 120 watts, target at least 144 watts and select the next available size above that.
Why the extra capacity? Heat, line variation, startup behavior, and long-term reliability all matter. Drivers last longer and perform better when they are not pushed to their limit every night. In premium residential and commercial work, that margin is worth more than the small upfront savings of undersizing.
There is one trade-off. Some dimmable drivers do not behave as well at extremely low loads, so going dramatically oversized is not ideal either. The best practice is not biggest available. It is correctly matched with reasonable reserve capacity.
A quick example
Say you have a 24V COB tape light rated 3 watts per foot and the project includes 22 feet.
Total load: 22 x 3 = 66 watts.
Add 20 percent headroom: 66 x 1.2 = 79.2 watts.
The correct choice would typically be an 80W or 96W 24V driver, depending on available sizes and dimming requirements. If the installation is in a hot location or enclosed space, choosing the next size up can make sense.
Dimming changes the driver choice
A lot of sizing problems are really dimming problems. The wattage may be correct, but the driver still performs poorly because it does not match the control system.
If the project uses a standard wall dimmer on the primary side, you may need a TRIAC, ELV, or MLV compatible dimmable driver. If the system is commercial or integrated with controls, 0-10V may be the right fit. For tunable white, RGB, or RGBW systems, the driver and controller need to be planned together.
Do not assume dimmable means universally dimmable. A driver that dims well on ELV may not perform the same way on TRIAC. Load range also matters. If the dimmer has a minimum load requirement or the driver has a narrow dimming window, oversizing can create unstable dimming at low light levels.
For high-end residential lighting, especially with COB strip and architectural applications, smooth dimming is part of the finish quality. It is not an accessory decision.
Installation conditions matter more than people think
Sizing is not just voltage and watts. The installation environment changes what driver belongs on the job.
If the driver is going in a wet or damp location, choose a unit rated for it. If space is tight, a compact driver with an integrated junction box may solve both code and fit issues. If the run length is long, voltage drop on the low-voltage side can affect performance, especially with 12V systems. In many cases, 24V is the better choice for longer runs because it reduces current and helps control voltage drop.
Enclosed spaces also affect driver life. A driver installed in a hot soffit, cabinet, or exterior enclosure may need more margin than the same driver mounted in open air. That is one reason professionals avoid sizing to the ragged edge.
How to size LED driver for strip lights
For LED strip lights, the cleanest process is to confirm strip voltage, calculate watts per foot times total footage, add headroom, then verify dimming and location rating. That handles most residential and commercial tape light projects.
If you are using COB strip, RGB, RGBW, or CCT strip, also account for the control setup. Some systems use separate controllers after the power supply, and some integrated products have specific driver requirements. With color-changing and tunable systems, compatibility is just as important as wattage.
Cuttable strip layouts can also change the final number. Always calculate based on the actual installed length, not the roll size.
Common sizing mistakes to avoid
The most common error is buying by wattage alone. A 100W driver is not automatically correct just because the load is under 100W. Output type, output voltage or current, and dimming protocol still have to match.
The second mistake is skipping headroom. Drivers run hotter and fail sooner when constantly loaded to their maximum rating.
The third is mixing driver and transformer terminology without checking the actual output. Many buyers use the terms interchangeably, but what matters is whether the product supplies the right DC voltage or regulated current for LEDs.
Another frequent issue is underestimating the effect of controls. Wall dimmers, low-voltage controls, and smart systems all have compatibility limits. If the lighting will be dimmed, size and select the driver around that fact from the start.
When the numbers are close
Sometimes two driver sizes could work. That is where application judgment comes in.
If the load calculates to 78 watts and the options are 80W or 96W, the 80W unit may be acceptable if the manufacturer permits full-rated loading and the environment is favorable. But if the driver will be enclosed, dimmed heavily, or expected to run long hours, the 96W option is usually the safer call.
If you are working with premium installations where dimming quality, long life, and service access matter, conservative sizing is the smarter move. That is why many pros buying from LA LED Lighting choose certified drivers with real compatibility data rather than generic supplies with vague specs.
The right driver should disappear into the project. No noise, no flicker, no nuisance failures, no second trip. If you size for the actual load, match the control method, and respect the installation conditions, that is exactly what happens.
A good LED system is only as dependable as the power behind it, so when you are choosing the driver, give the electrical details the same attention you give the finish work.