You flip the switch, connect the driver, or plug in the strip - and nothing happens. If you're asking why wont LED strip turn on, the problem is usually not the strip itself. In most cases, the issue comes down to power, polarity, compatibility, or a bad connection somewhere in the system.
That matters because LED strip lighting is a system, not a single part. The tape light, driver or transformer, controller, dimmer, wire gauge, connectors, and switch all need to match the load and voltage. When one piece is wrong, the strip can stay completely dark even if every other component is high quality.
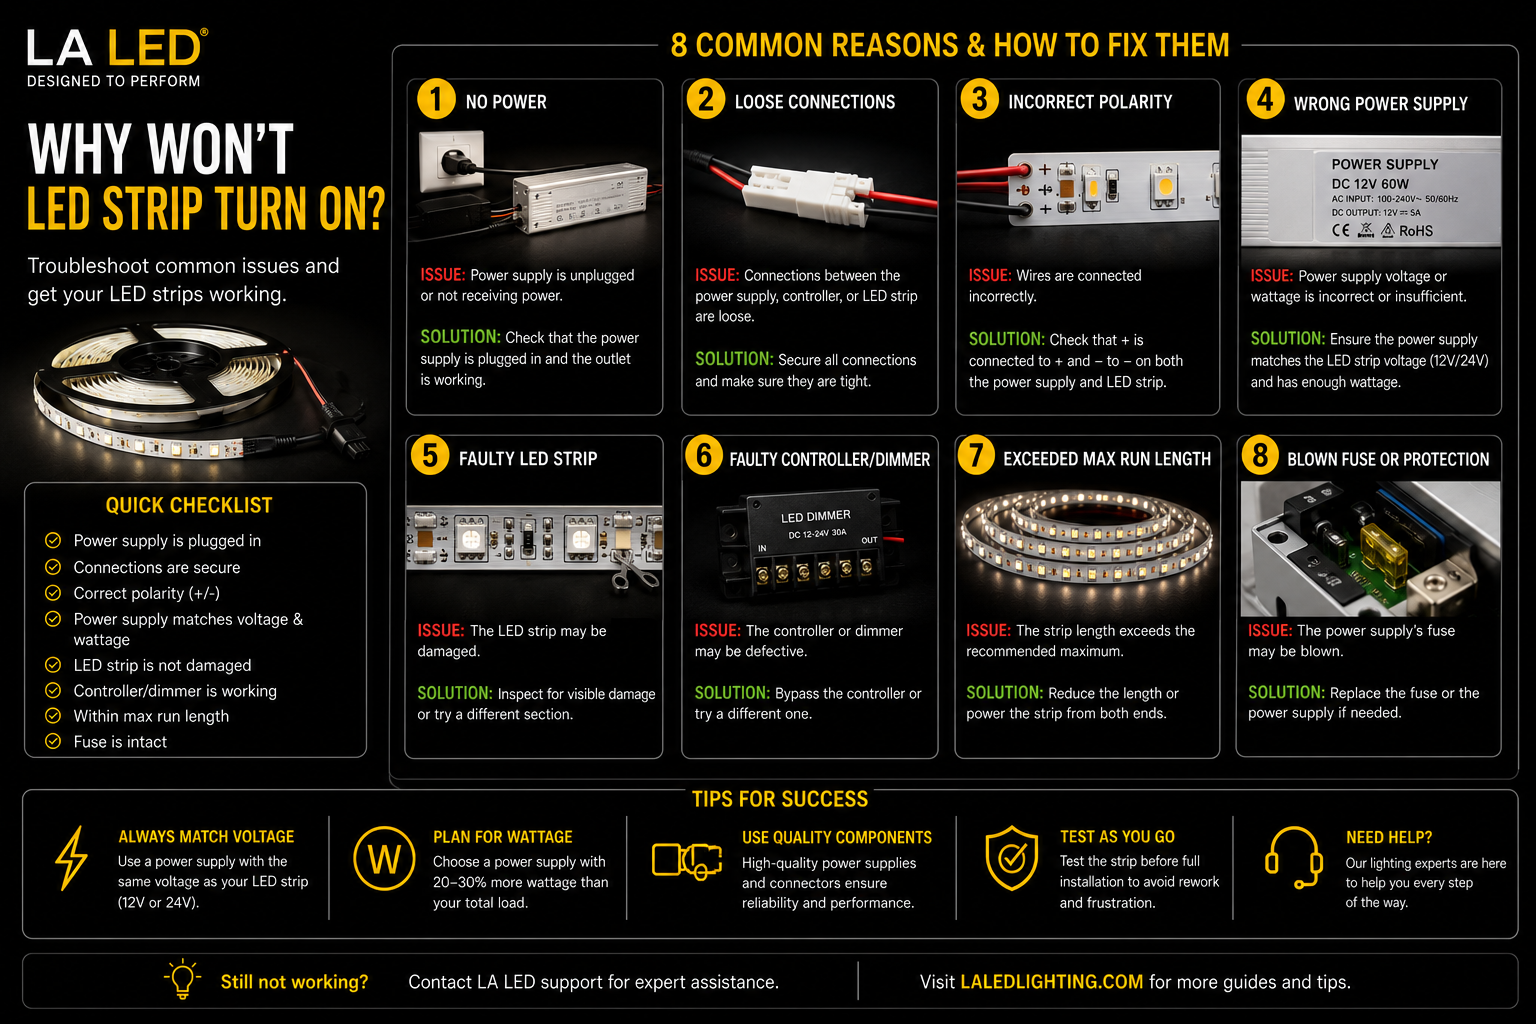
Why wont LED strip turn on in the first place?
Start with the simplest answer first - the strip is not getting the correct power. Most LED strip failures on day one are installation errors, not product defects. A 24V strip connected to a 12V driver may not light properly or may appear dead. A 12V strip connected to 120V line voltage directly can be destroyed immediately unless it is specifically rated as 110V or 120V strip lighting.
Voltage matching is the first checkpoint because LED tape lights are not universal. COB, RGB, RGBW, CCT, and single-color strips may look similar on the reel, but they often require different drivers, controllers, or both. If the strip worked on the bench and not after final installation, there is a good chance the issue is upstream in the wiring, dimming control, or power supply.
Check the power supply before you blame the strip
A dead or mismatched power supply is the most common reason an LED strip will not turn on. Confirm the driver or transformer is supplying the same DC voltage the strip requires. If the strip is labeled 24V DC, the output from the power supply must also be 24V DC. Not 12V, not AC, and not "close enough."
Next, verify capacity. If your strip load exceeds the driver's wattage rating, the driver may shut down, flicker, or fail to start. This happens often when longer runs are added late in the project without recalculating total wattage. A reliable setup includes headroom. Running a driver at its absolute maximum can create startup and longevity problems, especially in enclosed or warm locations.
If you're using a dimmable driver, compatibility also matters. TRIAC, ELV, MLV, and 0-10V systems are not interchangeable. A strip can appear nonfunctional when the real issue is an incompatible dimmer-driver pairing. In professional installations, this is one of the first things to rule out.
A quick test that saves time
If possible, disconnect the strip from any dimmer or controller and test it directly from the correct power supply. If it lights, the strip is fine and the problem is in the control chain. If it still stays off, continue checking polarity, output voltage, and connection points.
Polarity problems are more common than people think
Low-voltage LED strips are polarity-sensitive. Positive must connect to positive, and negative must connect to negative. Reverse the wires and many strips simply will not turn on.
This sounds basic, but it happens constantly in the field, especially with quick connectors, extensions, and RGB or CCT setups where multiple terminals are involved. On some strips, printed markings are small. On some connectors, wire labeling is not as clear as it should be. A fast visual check can save a lot of unnecessary troubleshooting.
If you're working with RGB, RGBW, or tunable white tape, make sure the common positive or common negative format matches the controller. Not every controller is built the same way. A mismatch here can make a perfectly good strip stay dark.
The connection may look fine and still be bad
LED strip connections fail in quiet ways. A solderless connector may clamp down without actually piercing the copper pads correctly. A cut section may be slightly off the cut line. A wire may be inserted but not fully seated. Even a small gap can stop power from reaching the strip.
This is especially true with COB strip lighting, where the light surface is more uniform but the electrical connection still depends on clean, accurate contact at the copper pads. If the strip was cut and reconnected, inspect that joint closely. If there is any doubt, redo the connection or test with a direct hardwired lead.
Poor connections are also more likely in wet, damp, or outdoor environments if the wrong accessories are used. Moisture-rated installations need properly enclosed drivers, sealed connections, and components designed for those conditions. A standard indoor connector in a landscape setup may work briefly, then fail.
Bad dimmer and controller pairings can shut the whole system down
If the strip is connected to a controller or wall dimmer and will not turn on, remove the control gear from the equation and test the strip with straight power. This matters with dimmable white strip lights and even more with RGB, RGBW, and CCT systems.
Controllers must match the strip type and voltage. A single-color strip will not run correctly from the wrong multi-channel controller. A tunable white strip needs a compatible CCT controller. An RGBW strip needs a controller that supports RGBW output, not just RGB. These differences are not cosmetic. They affect whether the strip powers on at all.
The same goes for dimmers. Some dimmable drivers are built for forward-phase control, others for reverse-phase, and others for 0-10V. If the dimmer protocol does not match the driver, the result may be flicker, dropout, or a strip that never starts.
Why wont LED strip turn on after cutting?
This version of the problem usually comes down to cutting location or damaged pads. LED strips are designed to be cut only at marked intervals. If the strip is cut between those points, the circuit can be interrupted in a way that stops the segment from working.
Even when the cut is technically correct, damaged copper pads can keep the connector from making contact. This is common when installers rush through trimming in a finish-stage install or use dull tools that tear instead of cut cleanly. On premium architectural jobs, precision here matters as much as the driver spec.
If only one section is dark and the rest of the reel works, the fault is usually local to that cut or splice point. If the entire strip is dark after cutting, start where the strip first reconnects to power.
Do not ignore the switch, breaker, or input side
Sometimes the LED side is fine and the issue is on the line-voltage side. Check that the breaker is on, the wall switch is functional, and the driver is receiving input power. A failed switch leg, loose junction box connection, or tripped GFCI can make it look like the strip failed when the driver is simply not energized.
This matters even more in remodel work where existing wiring may be reused. A premium LED strip paired with a poor electrical feed will still perform poorly. The system is only as reliable as the weakest point in the run.
Environmental and load conditions can also stop startup
Not every no-light issue is a wiring mistake. Heat, moisture, and overloaded runs can all create startup problems. Drivers installed in tight cavities without ventilation may go into protection mode. Outdoor transformers not rated for wet or damp locations may fail early. Long runs without proper power injection can create enough voltage drop that portions of the strip appear dead or very dim.
There is also a difference between a strip that never turns on and a strip that turns on briefly, then shuts off. That second scenario often points to overload, thermal protection, or a failing power supply rather than a dead strip.
When the strip itself is actually the problem
It does happen, just less often than people assume. Shipping damage, improper handling, direct line-voltage exposure, or installation on a dirty or overheating surface can damage LED tape. If the strip has visible burn marks, damaged traces, or crushed sections, replace it.
Professional-grade, UL-conscious components reduce this risk, but they do not remove the need for correct installation. High-quality products perform best when paired with properly matched drivers, compatible controls, and clean termination methods.
The fastest way to troubleshoot without wasting time
Work in order. Confirm input power to the driver. Confirm driver output voltage. Confirm strip voltage rating. Confirm polarity. Bypass dimmers and controllers. Inspect cut points and connectors. Then test a short section of strip directly from a known-good power supply.
That sequence is faster than swapping random parts and hoping something changes. It also helps you identify whether the issue is the strip, the driver, or the control setup before you reorder components you may not need.
For electricians, contractors, and design-focused homeowners, the real goal is not just getting the strip to light. It is getting a reliable system that performs correctly after the walls are closed, the millwork is finished, and the client expects it to work every time. If you build the setup around certified components, matched voltage, proper dimming compatibility, and solid connections, most "dead strip" calls disappear before they start. When you need dependable tape lights, drivers, compact transformers, and control gear built for real installations, LA LED Lighting is the kind of source that helps you get it right the first time.
A dark strip is frustrating, but it is usually telling you exactly where the system is weak.