
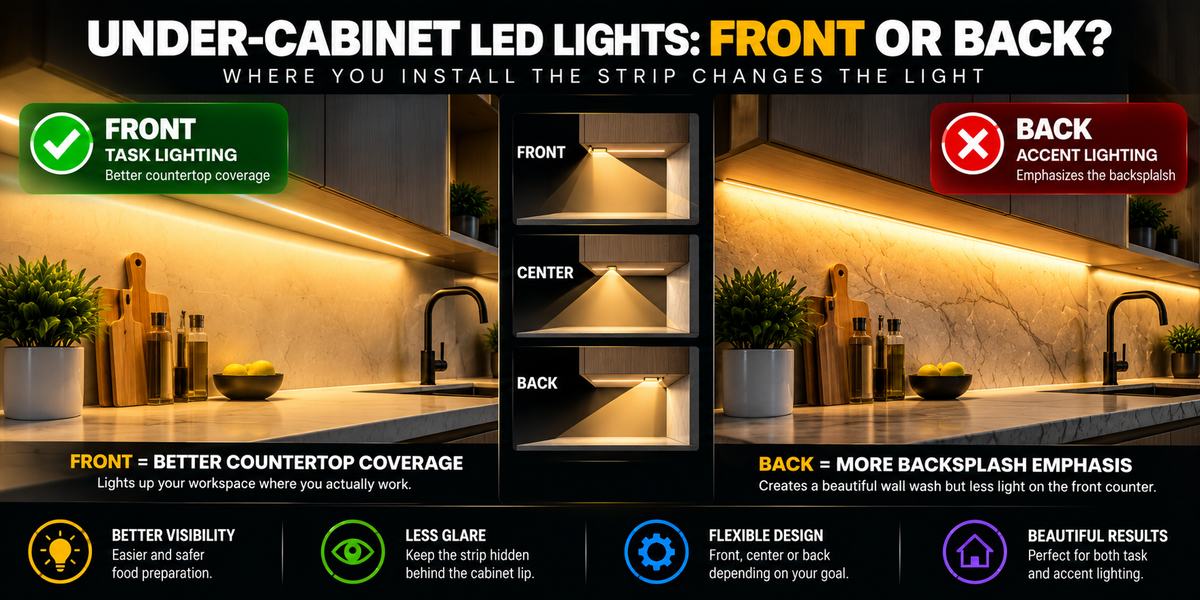
Should Under Cabinet LED Lights Be at the Front or Back?
Under-cabinet LED lighting seems simple:
Install an LED strip beneath the cabinet, connect the driver, and turn it on.
But where you position the strip beneath the cabinet can dramatically change the finished lighting.
One of the most common questions is:
Should under-cabinet LED lights be installed at the front or back?
For most installations where the primary goal is illuminating the countertop:
Closer to the front of the cabinet is usually the better starting position.
Why?
Because front placement tends to direct more useful light across the work surface instead of concentrating it against the backsplash.
But that doesn't mean the strip should always be installed directly at the very front edge.
The ideal position depends on:
- Cabinet depth
- Countertop depth
- Cabinet lip
- LED brightness
- Aluminum channel
- Diffuser
- Backsplash
- Countertop finish
- Desired lighting effect
Let's compare the options.
Why LED Strip Position Matters
Imagine a standard kitchen counter with an upper cabinet above it.
You have three possible LED positions:
FRONT — CENTER — BACK
The same COB LED strip can create three noticeably different lighting effects depending on which position you choose.
That's because changing the strip location changes:
- Where the strongest light lands
- How evenly the countertop is illuminated
- How much light reaches the backsplash
- Whether the LED source is visible
- Reflections from polished countertops
- Shadows created while you're working
So placement matters almost as much as brightness.
Front vs. Back: The Quick Answer
Here's the simplest comparison:
| Position | Best For | Main Advantage | Possible Issue |
|---|---|---|---|
| Front | Task lighting | Better countertop coverage | Potential visibility/glare |
| Center | Balanced lighting | Good compromise | May require testing |
| Back | Backsplash/accent | Highlights backsplash | Counter front may be darker |
For most kitchens where the LED strip is intended to provide useful task lighting, start by considering the front portion of the cabinet.
Why Front Placement Usually Works Better
When the LED strip is positioned toward the front, the light can spread more effectively across the countertop.
This is especially useful for:
- Food preparation
- Cooking
- Reading recipes
- Cleaning
- Small appliances
- General countertop work
Instead of putting most of the light near the wall, you bring the source closer to the area where your hands and objects are actually located.
Think About Where You Work
Most countertop activity doesn't happen directly against the backsplash.
You usually work somewhere around the:
Middle to Front Portion of the Countertop
If the LED strip is mounted all the way at the back, the brightest portion of the light may fall behind your primary work area.
Moving the light source forward can improve usable illumination.
Front Placement Can Also Reduce Body Shadows
Imagine standing at the counter.
If the primary room lighting is behind or above you, your body can cast a shadow onto the countertop.
Under-cabinet lighting helps solve this because the light source is directly above the work surface.
Positioning it farther forward can help illuminate the area where your hands are working.
This is one reason under-cabinet lighting can be such effective task lighting.
Does the LED Strip Need to Be at the Very Front Edge?
No.
Front placement doesn't necessarily mean directly against the front edge.
If the strip is too close to the edge, you may be able to see:
- The LED strip
- The diffuser
- Reflections
- The channel
depending on your viewing angle.
A better approach is often to place the channel somewhat behind the front edge, allowing the cabinet face or light rail to help conceal it.
The exact distance depends on the cabinet design.
What If the Cabinet Has a Front Lip?
Many cabinets have a small front lip or light rail beneath them.
This can be very useful.
You can install the COB strip and aluminum channel just behind that lip.
From normal standing height:
You don't see the strip.
But the light still reaches:
The Countertop.
This creates a much cleaner architectural appearance.
Where the lip is shallow and clearance is tight, our 6.5mm Ultra Slim COB Strip fits behind a lip that won't accommodate a wider strip and channel.
Why COB LED Strips Work Well Under Cabinets
COB LED strips are particularly well suited to under-cabinet lighting because they create a smooth, continuous-looking line of light.
Instead of seeing obvious individual LED points, you get a more uniform illuminated line.
This can be especially valuable when:
- Countertops are reflective
- Channels are shallow
- The strip may be visible from certain angles
- A clean architectural finish is desired
For a modern kitchen, COB + Aluminum Channel + Diffuser can create a very polished result.
Our 10mm Indoor Dotless COB Strip is the usual choice for this work — dot-free, dimmable, and bright enough for countertop tasks.
What Happens If You Install the Strip at the Back?
Installing the LED strip close to the backsplash creates a different effect.
The light tends to emphasize:
Backsplash + Rear Countertop Area
This can look beautiful when the backsplash is an important design feature.
For example:
- Marble
- Textured tile
- Stone
- Decorative backsplash
- Glossy surfaces
Back placement can create attractive wall illumination.
But it may not provide the best task lighting across the entire counter.
When Back Placement Makes Sense
Installing the strip toward the back can be appropriate when your main goal is:
Backsplash Accent Lighting
You want to emphasize texture or material.
Decorative Lighting
The strip is primarily for ambience rather than food preparation.
Shallow Countertops
The distance between front and back may be small enough that placement has less effect.
Very Wide Light Distribution
The strip/channel combination may distribute light sufficiently for the intended application.
Secondary Lighting
Other fixtures already provide strong task illumination.
In these cases, back placement can work well.
For a purely decorative rear run, a lower-output strip such as the 6.5mm Ultra Slim is often more appropriate than a task-grade strip turned down.
The Problem With Mounting Too Close to the Wall
If the strip is installed immediately against the backsplash, you may create a bright area near the wall while the front portion of the countertop receives less illumination.
You can end up with:
Bright Back → Darker Front
instead of:
Even Countertop Illumination
This is particularly noticeable when the LED strip has limited light distribution or the cabinet is deep.
Is Center Placement Better?
Sometimes.
Center placement can provide a compromise between:
Countertop Coverage
and:
Backsplash Illumination
If you're unsure about front or back placement, the center may seem like the safest choice.
But there is an even better approach:
Test the strip before permanently installing it.
Temporarily position the LED strip at:
- Front
- Center
- Back
Then look at the countertop from your normal working position.
You'll immediately see the difference.
Test Before Removing the Adhesive Backing
This is one of the easiest ways to avoid installation regret.
Before permanently attaching the COB strip or channel:
Temporarily power the strip.
Hold or tape it in several positions.
Then check:
- Countertop brightness
- Backsplash brightness
- Glare
- Reflections
- Shadows
- Visibility of the strip
Do this at night or when ambient lighting is low enough to clearly evaluate the LED effect.
Five minutes of testing can prevent having to reinstall the entire strip.
A 24V Plug-In Transformer makes this easy, since it powers a test length from a standard outlet with no hardwiring.
Countertop Material Changes the Result
Your countertop can significantly affect where the LED should go.
Consider the difference between:
Matte Countertop
Light is scattered more softly.
Polished Quartz
Can create visible reflections.
Granite
Reflection varies depending on finish and pattern.
Stainless Steel
Can create strong glare and reflections.
Glossy Stone
May reveal the LED source or diffuser.
A position that looks excellent over a matte countertop might create distracting reflections over polished stone.
Reflective Countertops Need Extra Attention
If your countertop is glossy, you may see a reflection of the LED channel.
Even COB strips can appear as a bright line in highly reflective surfaces.
In this case, you may need to adjust:
- Strip position
- Channel angle
- Diffuser
- Brightness
- Distance from front edge
Sometimes moving the strip slightly backward can reduce visible reflections while maintaining good countertop illumination.
Dimming helps here too — a dimmable driver lets you reduce output until the reflection stops being distracting rather than relocating the whole run.
The Backsplash Matters Too
A white backsplash reflects light very differently from a black backsplash.
Light Backsplash
Reflects more light back into the space.
Dark Backsplash
Absorbs more light.
Glossy Backsplash
Can create strong reflections.
Textured Backsplash
Can create attractive highlights and shadows.
If backsplash illumination is part of the design, the ideal strip position may move farther back.
White Kitchens Can Feel Brighter
A kitchen with:
White Cabinets + White Backsplash + Light Countertop
can reflect a large amount of LED light.
The same COB strip installed in a kitchen with:
Black Cabinets + Dark Stone + Dark Backsplash
may appear much less bright.
This means strip placement and lumen output should be considered together.
For a dark kitchen, the 12mm Double-Row COB Strip at 545–635 lm/ft gives you considerably more output than a standard single-row strip, and dims back down for a lighter scheme.
Should the Strip Point Straight Down?
Not always.
A standard surface-mounted channel often directs light downward.
But angled aluminum channels can change the light direction.
For example, an angled channel can direct light:
Toward the Center of the Countertop
instead of straight down.
This can be particularly useful when cabinet geometry makes the ideal mounting position difficult.
Front Placement + Angled Channel
One effective configuration can be:
COB Strip Near Front
Angled Aluminum Channel
Light Directed Toward Counter Center
This can create excellent task lighting while keeping the source concealed.
The exact angle depends on the channel and installation.
Back Placement + Angled Channel
You can also mount the strip farther back and use an angled channel to direct light outward.
This may work when:
- Front mounting isn't possible
- Cabinet construction limits mounting options
- You want to hide the channel
- You still need useful countertop coverage
So position isn't the only variable.
Light direction matters too.
Do You Need an Aluminum Channel?
For a permanent under-cabinet COB installation, an aluminum channel is often a good choice.
It can provide:
- Cleaner appearance
- Better strip alignment
- Physical protection
- Diffuser mounting
- Improved heat spreading
- Easier professional installation
Instead of attaching the LED strip directly to unfinished cabinet material, the channel creates a dedicated mounting surface.
What Does the Diffuser Do?
The diffuser covers the LED strip and modifies the appearance of the light.
A frosted diffuser can help:
- Soften the light
- Reduce glare
- Protect the strip
- Create a cleaner finished appearance
With COB strips, the light is already very smooth, but a diffuser can still improve the finished fixture appearance.
Keep in mind that diffusers can reduce some transmitted light.
Front Placement and Glare
The main disadvantage of moving the strip too far forward is potential glare.
If you can directly see the illuminated strip while sitting at:
- A dining table
- Kitchen island
- Nearby sofa
- Lower seating position
the installation may become distracting.
That's why the goal isn't simply:
“Move it as far forward as possible.”
The better goal is:
Move it forward enough to illuminate the counter while keeping the light source concealed.
Check the Installation While Sitting Down
This is often overlooked.
The LED strip may be completely hidden while you're standing at the counter.
Then you sit at the kitchen table and suddenly:
You can see the entire glowing strip.
Before permanent installation, inspect the light from:
- Standing position
- Sitting position
- Across the room
- Kitchen island
- Dining area
A good installation should look clean from normal viewing positions.
What About Kitchen Islands?
Under-cabinet lighting above perimeter counters and lighting around islands can behave differently.
If you're illuminating an island work surface from cabinetry or shelving above, light distribution should be evaluated based on:
- Work area
- Viewing angle
- Fixture height
- Surface reflectivity
The same principle still applies:
Put useful light where the task happens.
How Bright Should Under-Cabinet LED Strips Be?
Placement and brightness work together.
A very bright strip mounted poorly may produce worse task lighting than a moderate-output strip positioned correctly.
For under-cabinet lighting, consider:
- Lumens per foot
- Watts per foot
- CRI
- Color temperature
- Dimming
- Channel
- Placement
Don't select brightness independently from installation geometry.
A commonly used starting range for under-cabinet work is roughly 300–500 lm/ft. Our 10mm Indoor Dotless COB Strip sits in that band at 340 lm/ft in 2700K rising to 415 lm/ft in 5000K, drawing 4.27 W/ft.
High CRI Is Especially Useful in Kitchens
CRI describes how accurately colors appear under a light source.
For kitchen lighting, high-quality color rendering can improve the appearance of:
- Food
- Vegetables
- Wood
- Stone
- Cabinet finishes
- Countertops
A 90+ CRI COB strip can be a good choice for many kitchen applications.
Brightness is important, but light quality matters too.
Every strip in our COB range is CRI ~90, so the choice between them comes down to output and width rather than colour quality.
What Color Temperature Is Best?
There isn't one universal answer.
Common options include:
2700K
Warm and comfortable.
3000K
Warm but slightly cleaner; popular for residential kitchens.
4000K
Neutral and crisp.
5000K
Cooler, more task-oriented appearance.
Your under-cabinet lighting should usually coordinate with the room's other lighting and interior finishes.
All four are available as variants of the same 10mm strip, so changing colour temperature is a variant choice rather than a different product. If you would rather decide later, the CCT COB Strip tunes between 2700K and 6500K on demand.
Match the Downlights and Under-Cabinet Lighting
Imagine your ceiling downlights are:
3000K
but your under-cabinet strips are:
5000K
The kitchen may look visually inconsistent.
For a cohesive design, consider coordinating color temperature across:
- Downlights
- Pendants
- Under-cabinet COB
- Cove lighting
They don't always have to match exactly, but the combination should be intentional.
Our recessed downlights are 5CCT selectable, so the ceiling fixtures can be set on site to match whichever colour temperature you chose for the strip.
Dimming Is Highly Recommended
Under-cabinet lighting often serves two purposes:
Task Lighting
Bright while cooking.
Ambient Lighting
Soft in the evening.
A dimmable system allows the same installation to do both.
For example:
100% — Food Preparation
60% — Everyday Use
25% — Evening Ambience
This makes brightness and placement much more flexible.
Our 5-in-1 dimmable drivers accept TRIAC, ELV, MLV, 0–10V and PWM, so the driver works with whichever wall dimmer the kitchen already has.
Where Should the LED Driver Go?
Don't forget the driver when planning the strip location.
A typical system might be:
AC Power
↓
LED Driver
↓
Dimmer / Controller
↓
COB LED Strip
The driver should be located somewhere appropriate that remains:
- Accessible
- Protected
- Properly ventilated
- Suitable for the installation
Possible locations may include an appropriate cabinet or adjacent service area.
Avoid permanently burying a serviceable driver where it cannot be reached later.
Physical size matters inside cabinetry — our compact dimmable transformers use a smaller aluminum housing, and the junction-box versions terminate the AC connection inside the driver's own enclosure rather than in a separate box.
Hide the Wiring Too
A professional under-cabinet installation shouldn't have random wires hanging between cabinets.
Plan:
Driver Location → Cable Route → Channel → COB Strip
before installation.
For separate cabinets, you may need to route low-voltage wiring through or behind cabinetry.
Good planning makes the finished installation look integrated rather than added later.
What About Corner Cabinets?
Corners can create uneven lighting if strip placement isn't planned carefully.
Instead of forcing the strip into an awkward sharp bend, you may need:
- Separate strip sections
- Proper connectors
- Soldered leads
- Flexible wiring between channels
depending on the product.
Maintain consistent strip positioning through the entire kitchen so the light pattern doesn't suddenly change at corners.
Where cabinet runs need short or awkward segments, our Cuttable Free-Cut COB Strip has much shorter cut intervals than a standard strip, which reduces the dark gaps at corners and cabinet ends.
Should Every Cabinet Have the Strip in the Same Position?
Usually, consistency helps.
If one cabinet has the strip:
2 inches from the front
and another has it:
against the backsplash
the countertop illumination may look uneven.
Once you determine the best position through testing, use that location consistently wherever cabinet geometry allows.
What About Cabinets of Different Depths?
If cabinet depths vary, don't blindly use the exact same measurement from the wall.
Instead, think about the desired light location on the countertop.
Your goal is consistent illumination.
Different cabinet depths may require slightly different mounting positions or channel angles to achieve the same visual result.
Front vs. Back Example
Imagine a 24-inch-deep countertop beneath a standard upper cabinet.
Strip at Back
The backsplash and rear countertop receive strong illumination.
The front work area may be less bright.
Strip Near Front
More light reaches the central and front work area.
The backsplash may receive less direct illumination.
Strip in Center
Provides a compromise between the two.
Which is best?
If the goal is:
Food Preparation → Front
If the goal is:
Backsplash Accent → Back
If the goal is:
Balanced General Effect → Center
That's a useful starting rule.
What About Two LED Strips?
For deep cabinets, specialty work surfaces, or very high illumination requirements, some projects may use more than one lighting line.
For example:
Front COB Strip → Task Lighting
Back COB Strip → Backsplash Accent
This allows separate control of:
Function + Atmosphere
It isn't necessary for most kitchens, but it can create an excellent result in high-end installations.
A practical pairing is the 10mm strip at the front for task light and the 6.5mm Ultra Slim at the back for the accent layer.
Two Zones Can Be Even Better
Imagine:
Zone 1 — Front COB
Bright task lighting.
Zone 2 — Rear COB
Soft backsplash illumination.
During cooking:
Both ON
During evening ambience:
Rear Strip Only
This provides much more control over the kitchen atmosphere.
Two zones need two feeds — our 192W Dual-Channel Transformer provides both from a single enclosure and one AC connection.
Common Under-Cabinet Placement Mistakes
Avoid these common mistakes:
- Automatically mounting the strip against the wall
- Installing it too close to the front edge where it causes glare
- Ignoring countertop reflections
- Not testing before permanent installation
- Using visible SMD dots in a premium architectural installation
- Ignoring the cabinet lip
- Forgetting aluminum channels
- Choosing brightness without considering placement
- Mixing color temperatures unintentionally
- Hiding the driver permanently
- Leaving visible wiring
- Using inconsistent placement between cabinets
Good under-cabinet lighting requires more than simply sticking an LED strip under the cabinet.
The Best Installation Process
Use this approach before permanent installation.
Step 1 — Choose the COB Strip
Consider:
Lumens + Watts + CRI + CCT + Voltage
All five are listed on every product page in our COB strip range.
Step 2 — Select the Channel
Choose:
Straight or Angled
and:
Surface-Mount or Recessed
depending on the cabinet.
Step 3 — Temporarily Test Front Placement
Look at countertop coverage.
Step 4 — Test Center Placement
Compare the distribution.
Step 5 — Test Back Placement
Evaluate backsplash illumination.
Step 6 — Check Reflections
Especially on polished countertops.
Step 7 — Sit Down
Make sure the strip isn't visible from nearby seating.
Step 8 — Test Dimming
Evaluate both task and ambient brightness.
Step 9 — Plan Driver and Wiring
Make everything serviceable and clean. Size the driver against the total strip load.
Step 10 — Install Permanently
Only after confirming the best position.
This small amount of testing can make a huge difference.
Quick Placement Guide
| Your Priority | Recommended Starting Position |
|---|---|
| Maximum countertop task lighting | Toward Front |
| Food preparation | Toward Front |
| Balanced countertop + backsplash | Center |
| Decorative backsplash lighting | Toward Back |
| Highlighting stone/tile | Toward Back |
| Reflective countertop | Test Front/Center |
| Concealing the light source | Behind Front Lip / Channel |
| Maximum flexibility | Front + Rear Zones |
These are starting points—not absolute rules.
So, How Far From the Front Should It Be?
There isn't one universal measurement because cabinets and channels vary.
Instead of following an arbitrary number, position the strip so that:
1. The LED source is hidden from normal view
2. Light reaches the primary countertop work area
3. Glare is controlled
4. Reflections are acceptable
5. The installation looks consistent
Testing the actual strip in the actual kitchen is more reliable than applying one measurement to every cabinet.
Front or Back? The Simple Rule
If you remember only one thing from this article:
Task Lighting → Toward the Front
Backsplash Accent → Toward the Back
For most kitchen under-cabinet installations, the front portion of the cabinet is the better starting point because the countertop—not the backsplash—is the primary area you want to illuminate.
But don't install permanently until you've tested the light.
Final Thoughts
So, should under-cabinet LED lights be at the front or back?
For most kitchens where under-cabinet lighting is intended to provide useful countertop illumination:
Install the COB LED strip toward the front portion of the cabinet.
But keep it far enough behind the cabinet edge or light rail that the light source remains concealed.
If your primary goal is:
Decorative backsplash illumination
then a rear position may be better.
And if you want a balance of both:
Center placement or an angled channel may provide the best result.
The important thing is not to treat LED strip placement as an afterthought.
The same COB strip can look completely different depending on where you install it.
For the best result:
Choose the right COB strip → Test the position → Control glare → Use the right channel → Then install permanently.
For most kitchens that starts with the 10mm Indoor Dotless COB Strip and a dimmable driver sized to the run.
FAQ
Should under-cabinet LED strips go at the front or back?
For countertop task lighting, positioning the strip toward the front of the cabinet is usually the better starting point. Back placement is more suitable when emphasizing the backsplash.
How close to the front should under-cabinet lighting be?
There is no universal distance. Position it far enough forward to illuminate the work surface but far enough behind the cabinet edge or light rail to keep the source concealed.
Should under-cabinet lights be centered?
Center placement can provide a good balance between countertop and backsplash illumination. Testing front, center, and back positions before installation is recommended.
Why shouldn't I put the LED strip against the backsplash?
You can, but the rear portion of the counter and backsplash may receive much more light than the front work area.
Are COB LED strips good for under-cabinet lighting?
Yes. COB strips provide a smooth, continuous-looking light line that works particularly well for clean architectural under-cabinet installations. Browse our COB strip range by width and colour temperature.
Should I use an aluminum channel under cabinets?
An aluminum channel can provide better mounting, protection, heat spreading, diffuser support, and a cleaner finished appearance.
Should under-cabinet LED lights point straight down?
They can, but angled channels can help direct light toward the desired portion of the countertop.
What color temperature is best for kitchen under-cabinet lighting?
3000K and 4000K are popular choices, but the best CCT depends on the kitchen finishes and other lighting in the room.
Is 90+ CRI good for kitchen lighting?
Yes. High CRI is useful in kitchens because it helps food, countertops, cabinetry, and other colors appear more natural.
Should under-cabinet lighting be dimmable?
Dimming is very useful because the same COB lighting can provide bright task illumination during food preparation and softer ambient lighting later. Our 5-in-1 drivers support five dimming protocols.