
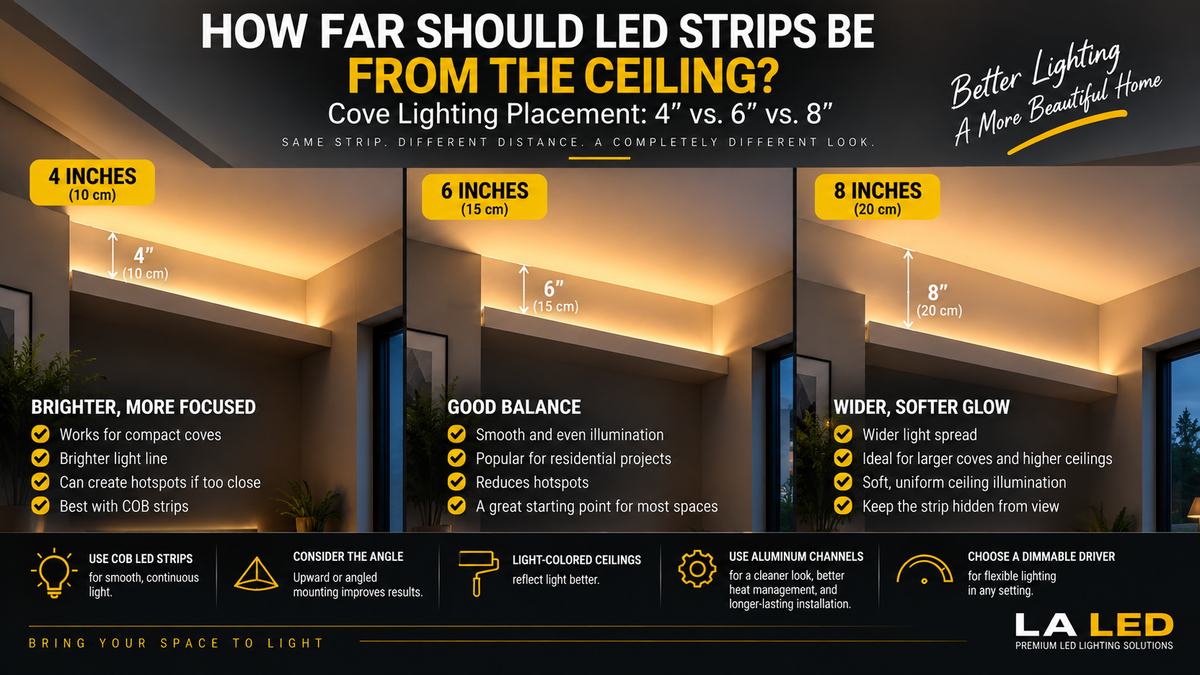
How Far Should LED Strips Be from the Ceiling in Cove Lighting?
Cove lighting can completely change the atmosphere of a room.
A hidden LED strip sends light toward the ceiling, creating a soft glow instead of direct illumination.
When installed correctly, you see:
Light — not the LED strip.
But there is one question that comes up repeatedly during installation:
How far should the LED strip be from the ceiling?
There isn't one universal measurement that works for every project.
However, for many residential cove-lighting designs, a starting range of roughly 4–8 inches (10–20 cm) between the LED strip area and the illuminated ceiling surface can be useful for testing and planning.
That is a starting point—not a rule.
The ideal distance depends on:
- Cove dimensions
- LED brightness
- Beam distribution
- Strip orientation
- Distance from the wall
- Ceiling height
- Surface color
- Desired light spread
- Aluminum-channel position
Understanding these factors is more important than simply following one measurement.
Why Does the Distance Matter?
Cove lighting depends on reflected light.
The basic idea is:
COB LED Strip → Ceiling → Reflected Light → Room
The ceiling effectively becomes part of the lighting system.
If the strip is positioned too close to the ceiling, the illuminated area may become concentrated.
If it is too far away, the light may spread differently, lose intensity at the ceiling, or expose parts of the installation.
Good cove lighting balances:
Distance + Angle + Brightness + Concealment
What Happens If the LED Strip Is Too Close to the Ceiling?
Imagine placing a bright strip only a very short distance below the ceiling.
The light doesn't have much space to spread before reaching the surface.
This can create:
- Bright lines
- Uneven illumination
- Concentrated hot spots
- A narrow band of light
- Visible imperfections in the ceiling
Instead of seeing a wide, soft glow, you may see a bright stripe following the cove.
For most architectural cove lighting, that is not the desired effect.
What Happens If the Strip Is Farther Away?
Increasing the distance gives the light more room to spread before reaching the ceiling.
This can create:
- Wider illumination
- Softer transitions
- More uniform ceiling glow
- Reduced concentration directly above the strip
But farther is not automatically better.
If the strip is positioned too far from the illuminated surface or poorly concealed, you may:
- Lose useful intensity
- See the strip from certain viewing angles
- Illuminate areas you didn't intend
- Create unwanted wall brightness
The entire cove geometry needs to work together.
Is 4 Inches Enough?
In some compact cove designs, approximately 4 inches (10 cm) can work.
This may be appropriate when:
- The cove is relatively shallow
- A COB strip is used
- The strip is well concealed
- Light output is appropriate
- The ceiling is light-colored
- The strip is positioned to spread light effectively
However, a 4-inch spacing should be tested before final installation.
With a very bright strip or certain channel orientations, the illuminated line may still appear too concentrated.
In a shallow cove, a lower-output strip such as our 6.5mm Ultra Slim COB Strip is often easier to work with than a high-brightness one, because there is less intensity to concentrate into a line.
What About 6 Inches?
Around 6 inches (15 cm) is a useful starting point for many residential cove-lighting mockups.
It can provide enough room for light to spread while keeping the strip relatively close to the ceiling.
A well-designed system around this geometry can create:
Hidden COB Strip → Broad Ceiling Glow → Soft Ambient Light
But the final result still depends heavily on the strip's output and position.
What About 8 Inches?
Approximately 8 inches (20 cm) can provide a broader light spread in some designs.
This may work well when:
- The cove is deeper
- The ceiling is higher
- A wider illuminated area is desired
- The strip has sufficient output
- The installation remains hidden
Again, treat the measurement as a design variable rather than a fixed requirement.
Quick Starting Guide
| Approximate Distance | Typical Effect |
|---|---|
| 2–3 in (5–8 cm) | Concentrated light; greater risk of a bright line |
| 4 in (10 cm) | Compact cove; can work with careful positioning |
| 6 in (15 cm) | Good starting point for many residential designs |
| 8 in (20 cm) | Broader, softer spread in suitable coves |
| 10+ in (25+ cm) | Can create broad illumination but needs sufficient output and proper geometry |
These are design starting points, not universal installation specifications.
Always test the actual LED strip and cove before finalizing construction.
Distance Isn't the Only Measurement That Matters
This is where many installations go wrong.
Installers focus only on:
Strip → Ceiling distance
But another measurement can be equally important:
Strip → Wall distance
The strip's horizontal position inside the cove affects where the light lands.
Move the strip toward the wall and you may emphasize the wall/ceiling transition.
Move it away from the wall and more light may spread across the ceiling.
The best position depends on the architectural effect you're trying to create.
Where Should the LED Strip Face?
Strip orientation can dramatically change cove lighting.
There are several approaches.
LED Facing Up
The strip points primarily toward the ceiling.
This creates strong indirect ceiling illumination and is one of the most common approaches.
LED Facing Toward the Wall
The strip illuminates the wall before light spreads toward the ceiling.
This can create a softer wall-washing effect.
LED Mounted at an Angle
An angled aluminum channel can direct light toward a specific part of the ceiling.
This gives you more control over the light distribution.
There isn't one universally correct orientation.
The best direction depends on the cove.
Why COB LED Strips Work Well for Cove Lighting
COB LED strips are particularly well suited to architectural cove lighting.
Their densely integrated light-emitting surface creates a much smoother visual line than traditional widely spaced LED packages.
Advantages include:
- Smooth linear appearance
- Reduced visible dotting
- Excellent indirect lighting
- Good performance in shallow profiles
- Clean architectural appearance
Our Indoor Dotless COB LED Strip (8mm) is the usual starting point for residential coves, with the 10mm version available where a wider PCB suits the profile better.
However, COB does not eliminate the need for proper placement.
Even a perfectly smooth COB strip can create an undesirable bright line if it is positioned too close to the illuminated surface.
Should You Use an Aluminum Channel?
For many permanent cove-lighting installations, an aluminum channel is a strong choice.
It can provide:
- Better mounting
- Heat transfer
- Physical protection
- Cleaner installation
- Easier strip alignment
- Optional diffuser
- More controlled positioning
A channel also helps keep the strip straight.
That matters because even small waves in an LED strip can create visible variations in reflected light.
Do You Need a Diffuser with COB?
Not always.
COB already provides a smooth light line.
And because cove lighting usually hides the strip from direct view, a diffuser may not be necessary solely for eliminating visible LED dots.
However, a diffuser can still provide:
- Physical protection
- A finished appearance
- Slight light softening
- Protection from dust and contact
Keep in mind that diffusers can reduce light output to some degree depending on the material and design.
The Cove Lip Is Important
A good cove needs to hide the LED strip from normal viewing positions.
The front edge or lip of the cove helps accomplish this.
Think of the layout like this:
Ceiling
↑ reflected light
COB LED Strip
Cove Lip → blocks direct view
If the lip is too low or the strip is positioned incorrectly, you may see the LEDs from across the room.
If it blocks too much light, the cove may become inefficient.
The goal is:
Hide the source without blocking the useful light.
Avoid Seeing the Strip from Across the Room
Before finalizing the installation, stand at:
- The room entrance
- Seating areas
- Bed position
- Hallway
- Staircase
- Opposite side of the room
If you can directly see the bright LED strip, adjust the cove geometry.
This is particularly important in rooms with:
- Low ceilings
- Tall occupants
- Open staircases
- Multiple viewing levels
Cove lighting usually looks best when the source remains hidden.
Ceiling Color Changes the Result
A white or light-colored ceiling reflects light efficiently.
A dark ceiling absorbs more light.
For example:
White Ceiling → More Reflection
Dark Ceiling → Less Reflection
If your ceiling is dark gray, black, wood, or another low-reflectance finish, you may need:
- More LED output
- Different placement
- Closer spacing
- More careful aiming
Don't assume a layout that works with a white ceiling will produce the same result on a dark surface. Where a dark ceiling is absorbing most of the light, the 12mm Double-Row High-Brightness COB Strip provides considerably more output than a standard single-row strip.
Glossy vs. Matte Ceilings
Surface finish also matters.
A matte ceiling tends to diffuse reflected light more softly.
A glossy ceiling can produce stronger reflections and may reveal:
- Bright lines
- Surface imperfections
- Individual reflections
- Uneven illumination
Cove lighting is often particularly attractive on smooth, light-colored matte surfaces.
How Bright Should the COB Strip Be?
Brightness depends on whether the cove is intended for:
Decorative Ambient Lighting
Lower output may be sufficient—the 6.5mm Ultra Slim COB Strip suits this.
Primary Indirect Lighting
Higher output may be necessary, which is where the 12mm Double-Row COB Strip earns its place.
Supplemental Lighting
Moderate output may work well alongside downlights or lamps—the 8mm Indoor Dotless COB Strip sits in this middle range.
Don't automatically choose the brightest strip available.
A very bright strip positioned too close to the ceiling may create harsh illumination rather than soft ambient light.
Dimming provides valuable flexibility.
Use a Dimmable Driver
Cove lighting is one of the best applications for dimming.
During the day, you may want:
80–100% brightness
At night:
20–40%
For movie watching:
10–20%
The exact levels depend on the room and product.
A compatible dimmable LED driver or controller lets you adjust the atmosphere instead of designing around one fixed brightness level. Our 5-in-1 Dimmable LED Drivers accept TRIAC, ELV, MLV, 0–10V and PWM, so the driver works with whichever wall dimmer the room already has.
2700K vs. 3000K for Cove Lighting
For residential cove lighting, both are popular.
2700K
Creates a warmer, more relaxing atmosphere.
Excellent for:
- Bedrooms
- Living rooms
- Dining rooms
3000K
Still warm but slightly cleaner and more contemporary.
Excellent for:
- Modern living rooms
- Kitchens
- Open-concept interiors
Both are available in the same 8mm Indoor Dotless COB Strip, so the choice is a variant selection rather than a different product.
For extremely warm decorative lighting, an 1800K Golden Yellow COB strip can create a dramatic candle-like glow.
What About 4000K?
4000K produces a more neutral appearance.
It can work in:
- Offices
- Modern kitchens
- Commercial interiors
- Workspaces
But for relaxing residential cove lighting, many homeowners prefer warmer 2700K or 3000K tones.
If a single cove needs to serve both purposes, our CCT COB LED Strip (2700K–6500K) shifts between warm and neutral on demand rather than committing to one temperature at installation.
How Far Should Cove Lighting Be from the Wall?
Again, there is no universal number.
The ideal distance depends on:
- Cove width
- Strip orientation
- Ceiling height
- Desired wall illumination
- Beam distribution
A strip positioned very close to the wall may create a stronger vertical glow.
Moving it farther toward the room can shift more illumination across the ceiling.
The best approach is to test the actual geometry.
A Simple Test Before Installation
This is one of the most useful things you can do.
Before permanently installing the cove:
Step 1
Take a short section of the actual COB strip.
Step 2
Place it inside a temporary mockup.
Step 3
Test approximately:
4 inches
6 inches
8 inches
from the illuminated ceiling surface where practical.
Step 4
Try different strip positions and angles.
Step 5
Turn off the room's other lights.
Step 6
Look at the ceiling from normal viewing positions.
Choose the arrangement that produces the smoothest result.
A 15-minute mockup can prevent an expensive installation mistake. A 24V Plug-In Transformer makes the mockup easier, since it powers a test section from a standard outlet with no hardwiring.
Look for the Gradient, Not Just Brightness
Good cove lighting should usually create a gradual transition.
You want something like:
Bright → Medium → Soft → Fade
not:
BRIGHT LINE → DARK CEILING
The smoothness of that gradient is often more important than maximum brightness.
Common Cove-Lighting Mistake: Strip Too Close
A strip installed too close to the ceiling can create:
████ Bright Line ████
rather than a soft wash.
Moving the strip farther away or changing its angle can allow the light to spread before reaching the ceiling.
Common Mistake: Strip Too Visible
Another common problem is designing the cove while standing directly underneath it.
From below, the strip may appear hidden.
But when you move across the room, it becomes visible.
Always test the installation from multiple viewing positions.
Common Mistake: Using Too Much Light
More lumens don't automatically create better cove lighting.
Excessive brightness can:
- Wash out the room
- Create glare
- Highlight ceiling imperfections
- Reduce the relaxing effect
- Make the cove look like task lighting
Cove lighting is usually about quality and distribution of light, not maximum output.
Common Mistake: Ignoring Voltage Drop
Long cove installations may run around large portions of a room.
That means voltage drop becomes important.
Symptoms can include:
Bright at beginning → Dim at end
For longer installations, you may need:
- Parallel wiring
- Power injection
- Multiple feeds
- Proper wire sizing
- Correct driver placement
The appropriate solution depends on the LED strip specifications and total system design. A perimeter cove usually splits naturally into two or three runs, which suits a multi-output unit such as the 192W Dual-Channel or 288W Triple-Output Transformer—each side of the room gets its own feed from one enclosure.
24V COB Is Often Practical for Longer Cove Runs
For comparable power levels, 24V LED strips typically operate at lower current than 12V strips.
This can make 24V systems practical for many architectural lighting installations.
Every COB strip in our range runs at 24V for this reason, and the 8mm Indoor Dotless COB is stocked in 16.5ft, 32ft and 82ft reels for longer perimeter work.
However, 24V does not mean unlimited run length.
Always follow the strip manufacturer's maximum run recommendations and plan power distribution accordingly.
Example: Modern Living Room
Imagine a modern living room with:
9-foot ceiling
White matte ceiling
Warm neutral walls
Hidden perimeter cove
24V COB strip
A good starting mockup might test the strip roughly:
4–8 inches below the ceiling
with the strip aimed upward.
Then adjust the distance and horizontal position until the ceiling shows a broad, smooth glow.
Pair it with:
3000K COB + Dimmable Driver
for flexible ambient lighting. In practice that is the 10mm Indoor Dotless COB Strip in 3000K with a 150W 5-in-1 Dimmable Driver sized for a full-room perimeter.
Example: Bedroom
For a bedroom, the goal may be softer.
You might use:
2700K COB
or
with lower brightness.
The strip can be hidden behind a ceiling detail or architectural molding.
The result should feel like the ceiling itself is glowing—not like there is a bright LED strip around the room.
Example: High Ceiling
With a higher ceiling or larger cove, you may need:
- Higher LED output
- Different strip position
- Different channel angle
- More distance for light spread
A compact cove design copied from an 8-foot ceiling may not produce the same effect in a 12-foot room.
Scale the lighting design with the architecture—a 12-foot ceiling is usually where the 12mm Double-Row COB Strip becomes the sensible choice over a single-row strip.
Cove Lighting Placement Checklist
Before final installation, check:
Is the LED strip hidden from normal viewing angles?
Does the light spread smoothly across the ceiling?
Are there visible bright lines or hotspots?
Is the COB strip mounted straight?
Is the channel appropriate for the strip width?
Is the driver correctly sized?
Is dimming compatible?
Have long runs been checked for voltage drop?
Does the color temperature suit the room?
Have you tested the lighting at night?
If all of these work together, the installation is much more likely to look professional. For the driver sizing and dimming items, every product page in our drivers and transformers range lists capacity, voltage and supported dimming methods.
Final Thoughts
So, how far should LED strips be from the ceiling in cove lighting?
For many residential installations, testing within approximately:
4–8 inches (10–20 cm)
can be a useful starting point.
Around 6 inches (15 cm) can be a practical first mockup for many designs.
But there is no universal perfect distance.
The final result depends on:
Cove Depth + Strip Position + Strip Angle + Brightness + Ceiling Surface + Viewing Angle
The goal isn't to achieve a particular measurement.
The goal is to create:
A wide, smooth, indirect glow with no visible LED strip and no harsh bright line.
For the best result, test the actual COB LED strip, aluminum channel, and cove dimensions before permanently installing the system.
FAQ
How far should an LED strip be below the ceiling for cove lighting?
A roughly 4–8 inch (10–20 cm) range can be useful for initial testing in many residential designs, but the ideal distance depends on the cove geometry, LED output, strip orientation, and desired light spread.
Is 6 inches enough for LED cove lighting?
It can be. Around 6 inches is a useful starting point for testing many residential cove designs, but the actual installation should be evaluated with the specific LED strip and room.
What happens if the LED strip is too close to the ceiling?
The light may create a narrow bright line or hotspot instead of a broad, smooth ceiling glow.
Should LED strips face up in cove lighting?
Often they do, but strips can also face toward a wall or be mounted at an angle depending on the desired effect.
Are COB LED strips good for cove lighting?
Yes. COB strips provide a smooth continuous-looking light source that works especially well for hidden architectural and indirect lighting. Browse our single-colour COB strip range by width and colour temperature.
Do I need an aluminum channel for cove lighting?
Not every installation requires one, but channels can improve mounting, alignment, heat transfer, protection, and the overall finish.
What color temperature is best for cove lighting?
2700K and 3000K are popular for residential spaces. 1800K can create an ultra-warm decorative atmosphere, while 4000K provides a more neutral appearance.
Should cove lighting be dimmable?
Dimming is highly useful because cove lighting often serves different purposes throughout the day. Make sure the LED strip, driver, and dimming control are compatible. Our 5-in-1 dimmable drivers support TRIAC, ELV, MLV, 0–10V and PWM.
How do I prevent hotspots in cove lighting?
Increase the distance between the strip and illuminated surface where appropriate, adjust the strip position or angle, use a smooth COB strip, and test the design before permanent installation.